AWS Feed
Building a custom IAM system has made me appreciate AWS IAM even more

In the last post I discussed my preferred approach for modelling multi-tenant applications with AppSync and Cognito. This approach supports the common requirements in these applications, where there are a number of distinct roles within each tenant.

This approach (and others like it) works great when the tenants are isolated. But what if they are not? What if the tenants fall into an organizational hierarchy?
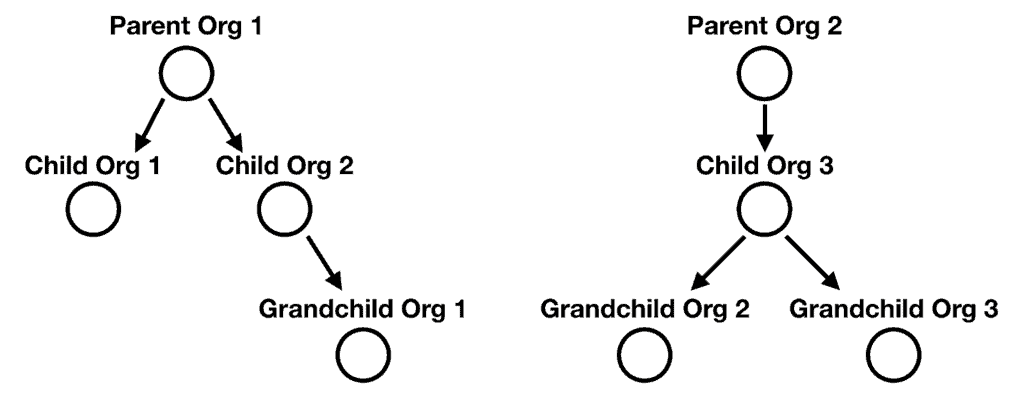
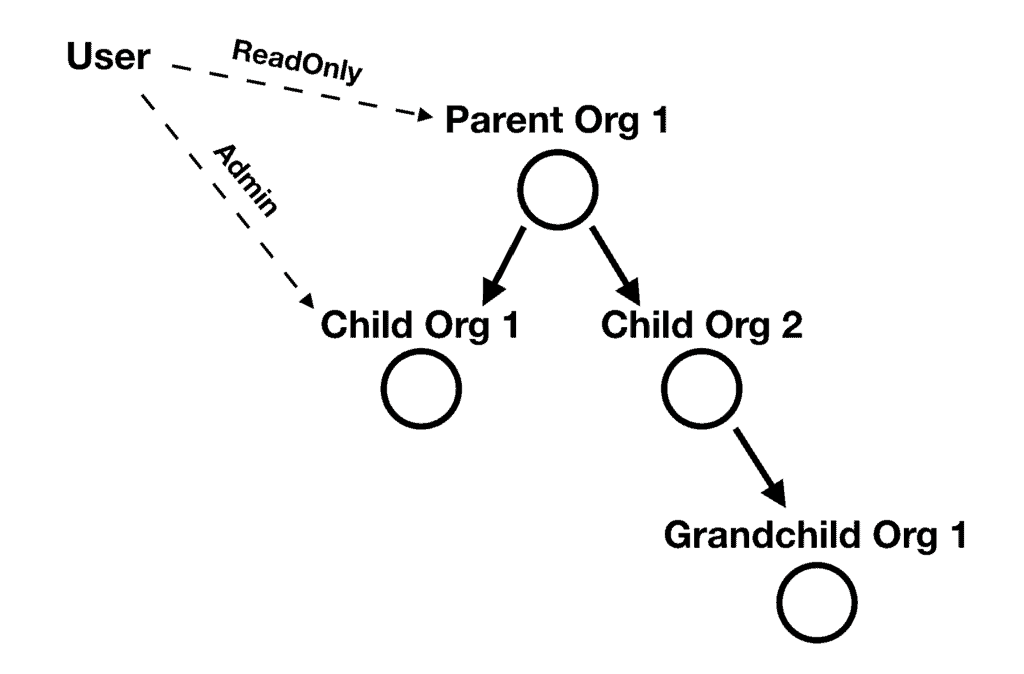
And what if a user can hold different roles at different organizations in the hierarchy? For example, a user can have a ReadOnly role at the root organization, but also have an Admin role for one of the child organizations.
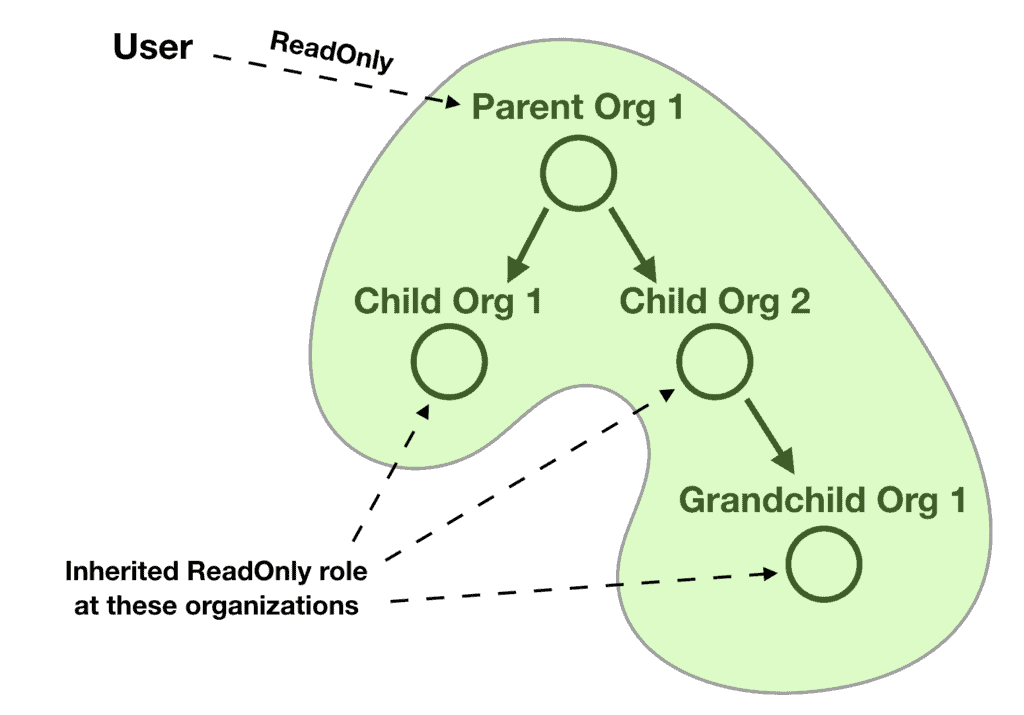
And what if the user’s roles are automatically inherited for the child organizations? So if the user has a ReadOnly role at the parent organization, then it inherits that role for all the child organizations and their child organizations and so on.
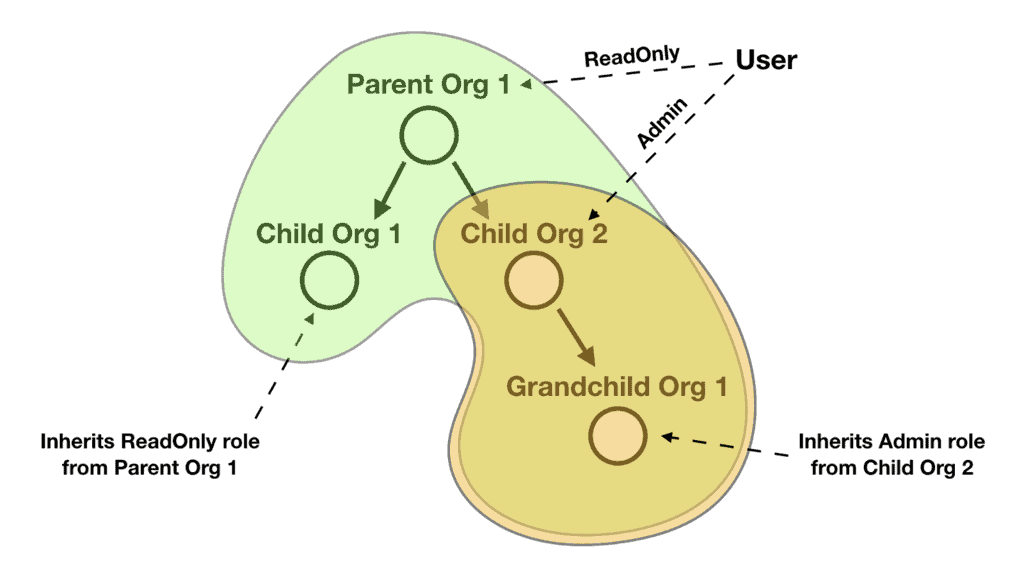
And what if the inherited roles can be superseded by more permissive roles? For example, if the above user also has an Admin role at one of the child organizations, then that Admin role supersedes the ReadOnly role the user inherits from the parent organization. Any child organizations of this child organization would therefore inherit the Admin role instead.
And while it might be uncommon, it’s entirely possible for a user to simultaneously hold roles at two separate organization hierarchies too.
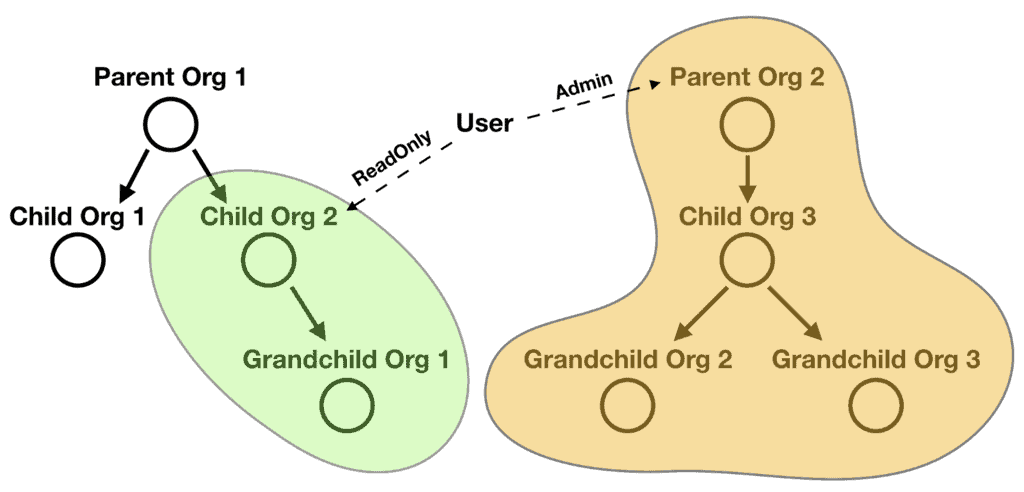
What data a user is allowed to see, and what actions this user is allowed to perform have to be contextualised around the organization and the user’s role at that organization.
These were the requirements that I was struggling with.
I thought long and hard about different ways to tackle this set of requirements. In the end, I settled on implementing a custom IAM mechanism that takes a lot of inspiration from AWS IAM.
IAM policy document
At the heart of it is a user’s IAM policy document, which looks like this:
{ "Version": "2021-03-09", "Statement": { "Action": "consentForm.get", "Resource": "consentForm:*", "Condition": [{ "Or": [{ "Null": { "orgId": true } }, { "AttributeEquals": { "orgId": "327176da-ad62-43eb-b236-da0b21eb38a5" } }] }] }
}
This is heavily inspired by AWS IAM, right down to the fact that each of the fields Action, Resource and Condition can be singular or an array!
Just like AWS IAM, all actions are presumed to be denied unless an IAM statement grants permission to perform the action on a resource.
Both Action and Resource fields allow wildcards (*), so it’s possible to create a very permission policy with something like this:
{ "Version": "2021-03-09", "Statement": { "Action": "*", "Resource": "*" }
}
Of course, doing so would be undesirable and would not be suitable for tenant users (but applicable for system admins).
Challenges
A number of challenges quickly become apparent as I started to implement this system. They gave me a lot of appreciation for the work the AWS engineers have done with AWS IAM!
Create actions needs wildcards
Every resource has a unique path. For example, a consent form would have a unique identifier such as consentForm:{formId}. However, when the user creates a new consent form, its ID is generated at random so we don’t know it ahead of time.
This is why the IAM policy has to use a wildcard in these cases.
{ "Version": "2021-03-09", "Statement": { "Action": "consentForm.put", "Resource": "consentForm:*" }
}
The unique identifier doesn’t always contain the organization ID
Many of the resources’ unique identifiers don’t contain the organization ID and some resources don’t belong to a single organization. This applies to the consent form example we looked at above.
What this means is that we can’t rely on Action and Resource alone to restrict access to an organization’s data. This is why there is also the Condition clause. For example, to restrict access to consent forms, we will have an IAM policy like this:
{ "Version": "2021-03-09", "Statement": { "Action": "consentForm.get", "Resource": "consentForm:*", "Condition": [{ "Or": [{ "Null": { "orgId": true } }, { "AttributeEquals": { "orgId": "327176da-ad62-43eb-b236-da0b21eb38a5" } }] }] }
}
This policy allows the user to access consent forms that are either public (ie. orgId is null) or they belong to one of its organizations.
The conditions are checked against the consent form object itself to see if the conditions are met.
“Wait, if a user tries to fetch a consent form by form ID, how do you know if the form is public or belong to the right organizations?”
Great question!
Sometimes we have to fetch the data first…
Given a query operation like this (this is an AppSync API, so this is part of the GraphQL schema):
getConsentForm(formId: ID!): ConsentForm
We don’t have enough information to determine if the user should be allowed to access the consent form.
So, we have to first fetch the data from the DynamoDB table before we can check it against the user’s policy document to see if the user can access the form. This is when the Condition clause is applied against the consent form object we fetched from DynamoDB.
{ "Version": "2021-03-09", "Statement": { "Action": "consentForm.get", "Resource": "consentForm:*", "Condition": [{ "Or": [{ "Null": { "orgId": true } }, { "AttributeEquals": { "orgId": "327176da-ad62-43eb-b236-da0b21eb38a5" } }] }] }
}
This is obviously not the most efficient as we have to incur latency and cost to fetch the data from DynamoDB even though the user might not be allowed to see it. But given the requirement, I couldn’t see any other way around it.
Fortunately, in many other cases the organization ID is part of the request arguments and we’re able to validate the request without first fetching the data from DynamoDB.
For example, when the user looks to fetch the information about an organization, they have to provide the organization ID in the request.
getOrganization(orgId: ID!): Organization
The IAM policy for this can be as simple as this:
{ "Version": "2021-03-09", "Statement": { "Action": "organization.get", "Resource": "organization:327176da-ad62-43eb-b236-da0b21eb38a5" }
}
Returning arrays are problematic
For requests that fetch a single item, we can authenticate it by either:
- check the request arguments against the IAM policy
- fetch the data first then check the data against the IAM policy
If the user is not allowed to access the data then we can throw an Unauthorized error.
When it comes to returning an array of items, things become more complicated. For instance, when a user performs a search or list operations like these:
type Query { searchOrganizations( query: String! limit: Int! nextToken: String sort: [Sort!] ): SearchOrganizationsPage listConsentsByPatient( patientId: ID! limit: Int! nextToken: String ): ListConsentsPage
} ... type SearchOrganizationsPage { results: [Organization!] nextToken: String
} type ListConsentsPage { consents: [Consent!] nextToken: String
}
When returning an array of items, the user might be allowed to see at least some of the items. So it wouldn’t make sense to throw an unauthorized error in this case. Instead, we should filter out the items that the user is not allowed to see. But even that can be problematic too!
If the user is not allowed to see any of the items returned by the search or list operation, then we will end up returning an empty page of results. While this is not the end of the world, it would make the user experience for paginations very strange. You might be able to compensate for this by handling these oddities in the frontend, but that adds a whole lot of complexity!
Instead, as much as possible, we need to contextualize these operations in the frame of “what the user is allowed to access”.
In the case of the search operations, this meant that we have to modify the ElasticSearch query to include an array of should clauses – one for every organization the user is allowed to access.
#set ( $should = [] )
#foreach ($orgId in $context.prev.result) $util.qr($should.add({ "match": { "orgId": "$orgId" } }))
#end ... { "version": "2017-02-28", "operation": "GET", "path": "/organizations/organization/_search?sort=$sort", "params": { "headers": {}, "queryString": {}, "body": { "from": $ctx.stash.from, "size": $size, "query": { "bool": { "filter": $util.toJson($filter), "should": $util.toJson($should), "minimum_should_match": 1 } } } }
}
Unfortunately, with the way ElasticSearch works, you can’t use term queries on text fields. In the official documentation it says:
Avoid using thetermquery fortextfields. By default, Elasticsearch changes the values oftextfields as part of analysis. This can make finding exact matches fortextfield values difficult. To searchtextfield values, use thematchquery instead.
With match queries, it’s possible to return false positives. That is, it’s possible to return data from ElasticSearch that the user is not allowed to see!
So, you also have to filter the search results from ElasticSearch based on the user’s IAM policy… I know… I hate ElasticSearch too…
(Unfortunately, this project falls under HIPAA and Algolia is not HIPAA compliant out-of-the-box. We were quoted $75,000 a year for an enterprise contract that offers HIPAA compliance. So we’re stuck with ElasticSearch.)
Using pipeline resolvers for authentication
To perform the necessary authentication, we have two Lambda functions that are invoked as pipeline resolvers – one for checking the request arguments, and one for checking the result (either a single item or an array of items).
A deleteUser mutation, for instance, would fetch the user from DynamoDB first before invoking the authentication function to check if the caller has the permission to delete this user based on the caller’s IAM policy.
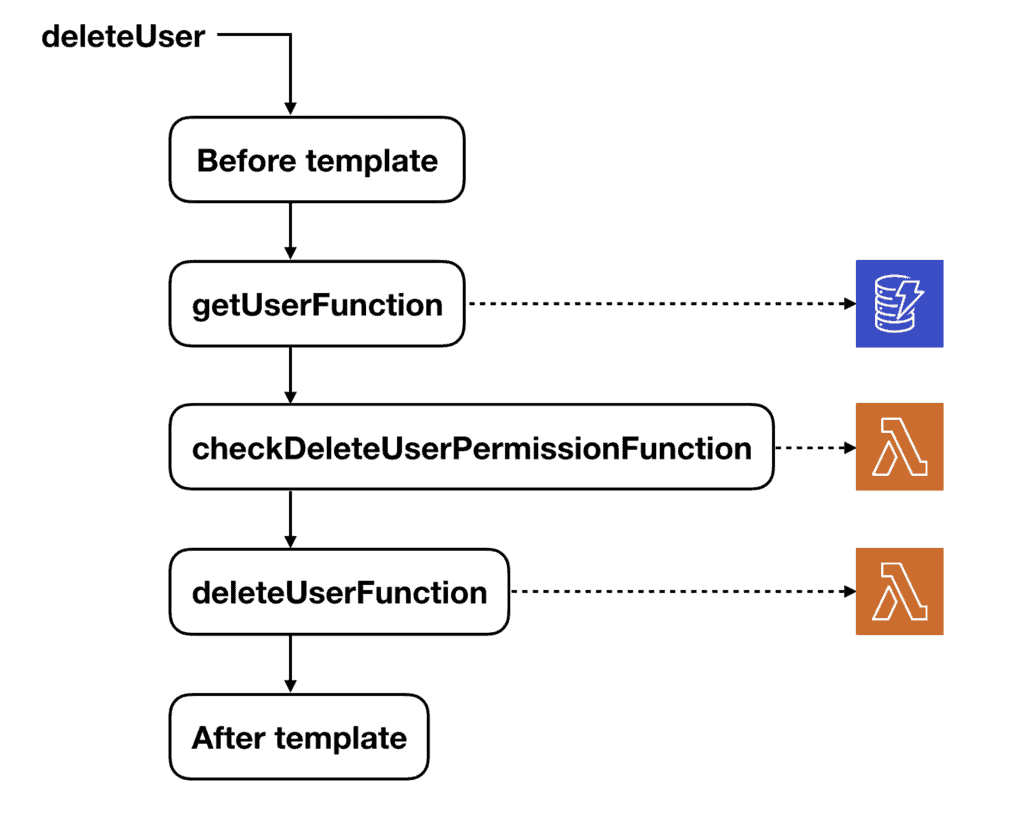
This is another example where we need to fetch the data before DynamoDB before we can authenticate if the user is allowed to perform the action.
Summary
In this post, I explained the use case and the design of a custom IAM system that I have built recently. And I explained many of the challenges that we faced in building this system.
Building this system it has made me appreciate AWS IAM much more and the effort its engineers have put in. No doubt they would have faced many of the same challenges that we came across and they have had to deal with a much wider range of actions and resources.
I hope you have enjoyed this post, and please let me know if you can think of simpler ways to tackle the problem. Perhaps one that doesn’t involve building a custom IAM system!
Liked this article? Support me on Patreon and get direct help from me via a private Slack channel or 1-2-1 mentoring.

Hi, my name is Yan Cui. I’m an AWS Serverless Hero and the author of Production-Ready Serverless. I specialise in rapidly transitioning teams to serverless and building production-ready services on AWS.
Are you struggling with serverless or need guidance on best practices? Do you want someone to review your architecture and help you avoid costly mistakes down the line? Whatever the case, I’m here to help.
The post Building a custom IAM system has made me appreciate AWS IAM even more appeared first on theburningmonk.com.
