AWS Feed
Creating a notification workflow from sensitive data discover with Amazon Macie, Amazon EventBridge, AWS Lambda, and Slack

Following the example of the EU in implementing the General Data Protection Regulation (GDPR), many countries are implementing similar data protection laws. In response, many companies are forming teams that are responsible for data protection. Considering the volume of information that companies maintain, it’s essential that these teams are alerted when sensitive data is at risk.
This post shows how to deploy a solution that uses Amazon Macie to discover sensitive data. This solution enables you to set up automatic notification to your company’s designated data protection team via a Slack channel when sensitive data that needs to be protected is discovered by Amazon EventBridge and AWS Lambda.
The challenge
Let’s imagine that you’re part of a team that’s responsible for classifying your organization’s data but the data structure isn’t documented. Amazon Macie provides you the ability to run a scheduled classification job that examines your data, and you want to notify the data protection team when there’s new sensitive data to classify. Let’s build a solution to automatically notify the data protection team.
Solution overview
To be scalable and cost-effective, this solution uses serverless technologies and managed AWS services, including:
- Macie – A fully managed data security and data privacy service that uses machine learning and pattern matching to discover and protect your sensitive data in Amazon Web Services (AWS).
- EventBridge – A serverless event bus that connects application data from your apps, SaaS, and AWS services. EventBridge can respond to specific events or run according to a schedule. The solution presented in this post uses EventBridge to initiate a custom Lambda function in response to a specific event.
- Lambda – Runs code in response to events such as changes in data, changes in application state, or user actions. In this solution, a Lambda function is initiated by EventBridge.
Solution architecture
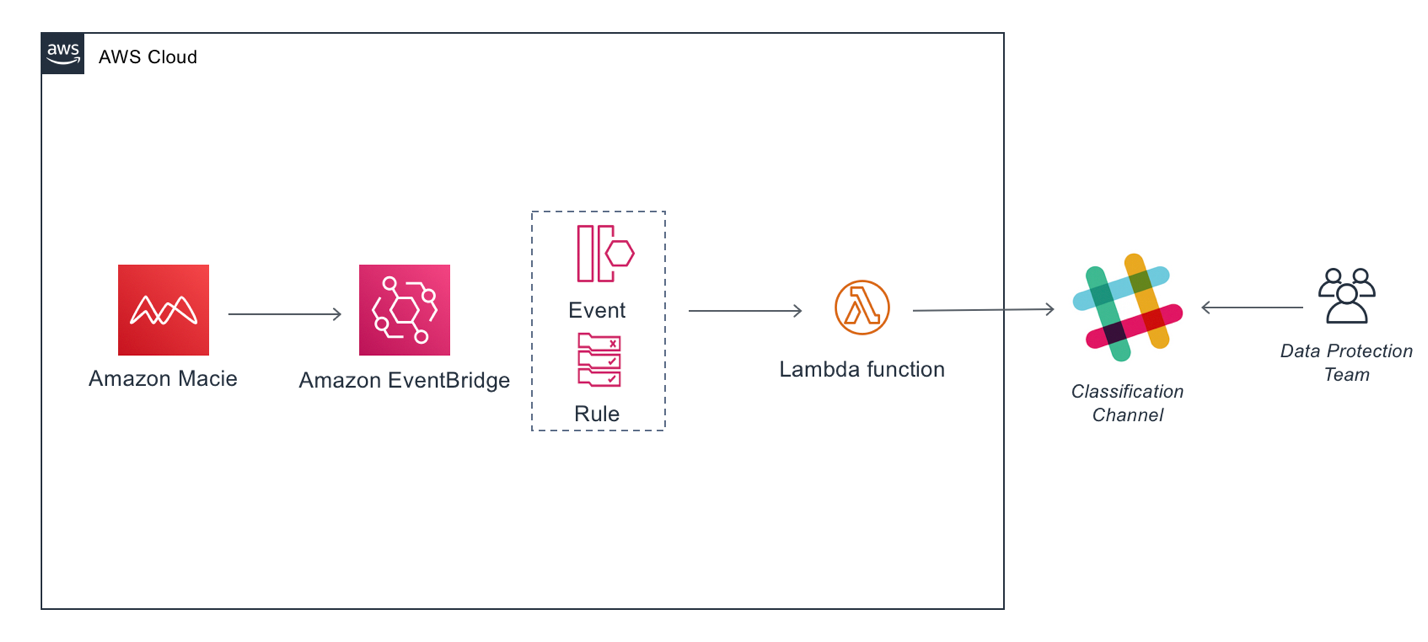
The architecture workflow is shown in Figure 1 and includes the following steps:
- Macie runs a classification job and publishes its findings to EventBridge as a JSON object.
- The EventBridge rule captures the findings and invokes a Lambda function as a target.
- The Lambda function parses the JSON object. The function then sends a custom message to a Slack channel with the sensitive data finding for the data protection team to evaluate and respond to.

Figure 1: Solution architecture workflow
Set up Slack
For this solution, you need a Slack workspace and an incoming webhook. The workspace must be in place before you create the webhook.
Create a Slack workspace
If you already have a Slack workspace in your environment, you can skip forward, to creating the webhook.
If you don’t have a Slack workspace, follow the steps in Create a Slack Workspace to create one.
Create an incoming webhook in Slack API
- Go to your Slack API.
- Choose Start Building to create an app.
- Enter the following details for your app:
- Choose the Create App button.
- In the left menu, choose Incoming Webhooks.
- At the Activate Incoming Webhooks screen, move the slider from OFF to ON.
- Scroll down and choose Add New Webhook to Workspace.
- In the screen asking where your app should post, enter the name of the Slack channel from your Workspace that you want to send notification to and choose Authorize.
- On the next screen, scroll down to the Webhook URL section. Make a note of the URL to use later.
Deploy the CloudFormation template with the solution
The deployment of the CloudFormation template automatically creates the following resources:
- A Lambda function that begins with the name named macie-to-slack-lambdafindingsToSlack-.
- An EventBridge rule named MacieFindingsToSlack.
- An IAM role named MacieFindingsToSlackkRole.
- A permission to invoke the Lambda function named LambdaInvokePermission.
Note: Before you proceed, make sure you’re deploying the template to the same Region that your production Macie is running.
To deploy the Cloudformation template
- Download the YAML template to your computer.
Note: To save the template, you can right click the Raw button at the top of the code and then select Save link as if you’re using Chrome, or the equivalent in your browser. This file is used in Step 4.
- Open CloudFormation in the AWS Management Console.
- On the Welcome page, choose Create stack and then choose With new resources.
- On Step 1 — Specify template, choose Upload a template file, select Choose file and then select the file template.yaml (the file extension might be .YML), then choose Next.
- On Step 2 — Specify stack details:
- Enter macie-to-slack as the Stack name.
- At the Slack Incoming Web Hook URL, paste the webhook URL you copied earlier.
- At Slack channel, enter the name of the channel in your workspace that will receive the alerts and choose Next.

Figure 2: Defining stack details
- On Step 3 – Configure Stack options, you can leave the default settings, or change them for your environment. Choose Next to continue.
- At the bottom of Step 4 – Review, select I acknowledge that AWS CloudFormation might create IAM resources, and choose Create stack.

Figure 3: Confirmation before stack creation
- Wait for the stack to reach status CREATE_COMPLETE.
Running the solution
At this point, you’ve deployed the solution and your resources are created.
To test the solution, you can schedule a Macie job targeting a bucket that contains a file with sensitive information that Macie can detect.
Note: You can check the Amazon Macie documentation to see the list of supported managed data identifiers.
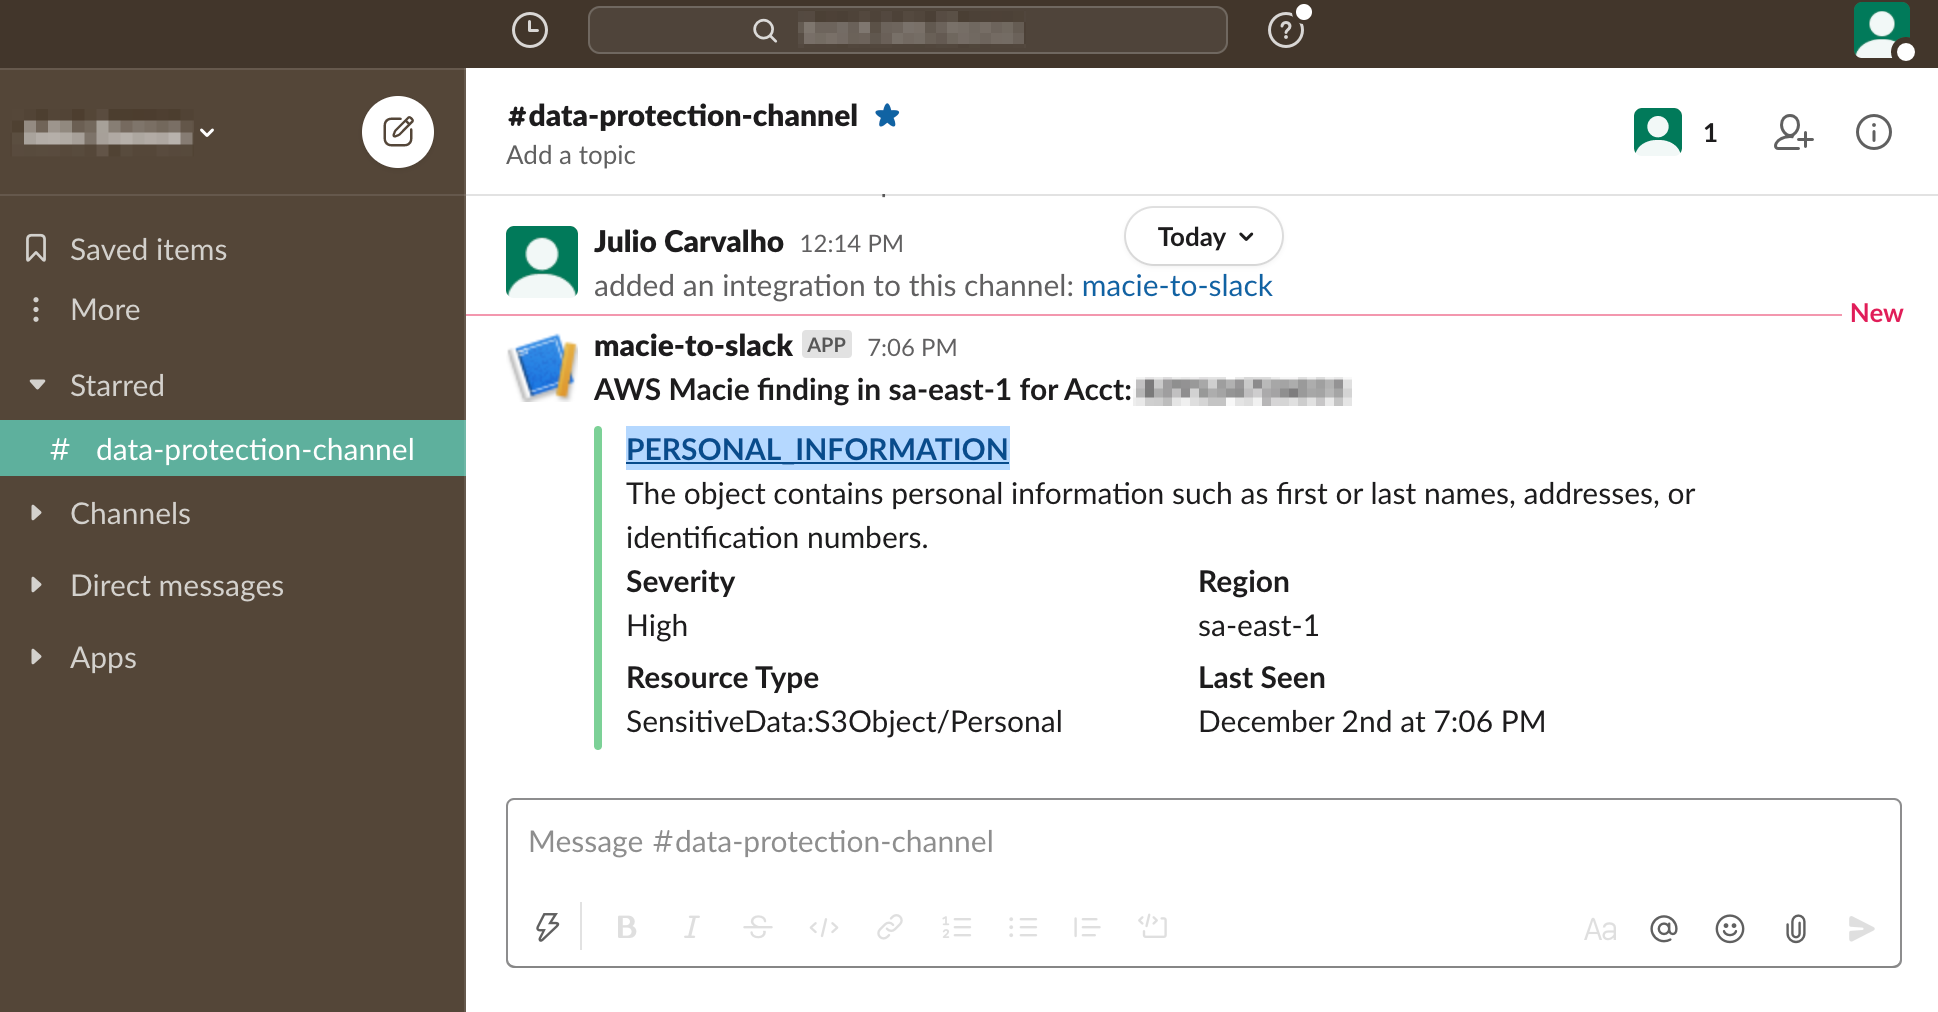
When the Macie job is complete, any findings are sent to the Slack channel.

Figure 4: Macie finding delivered to Slack channel
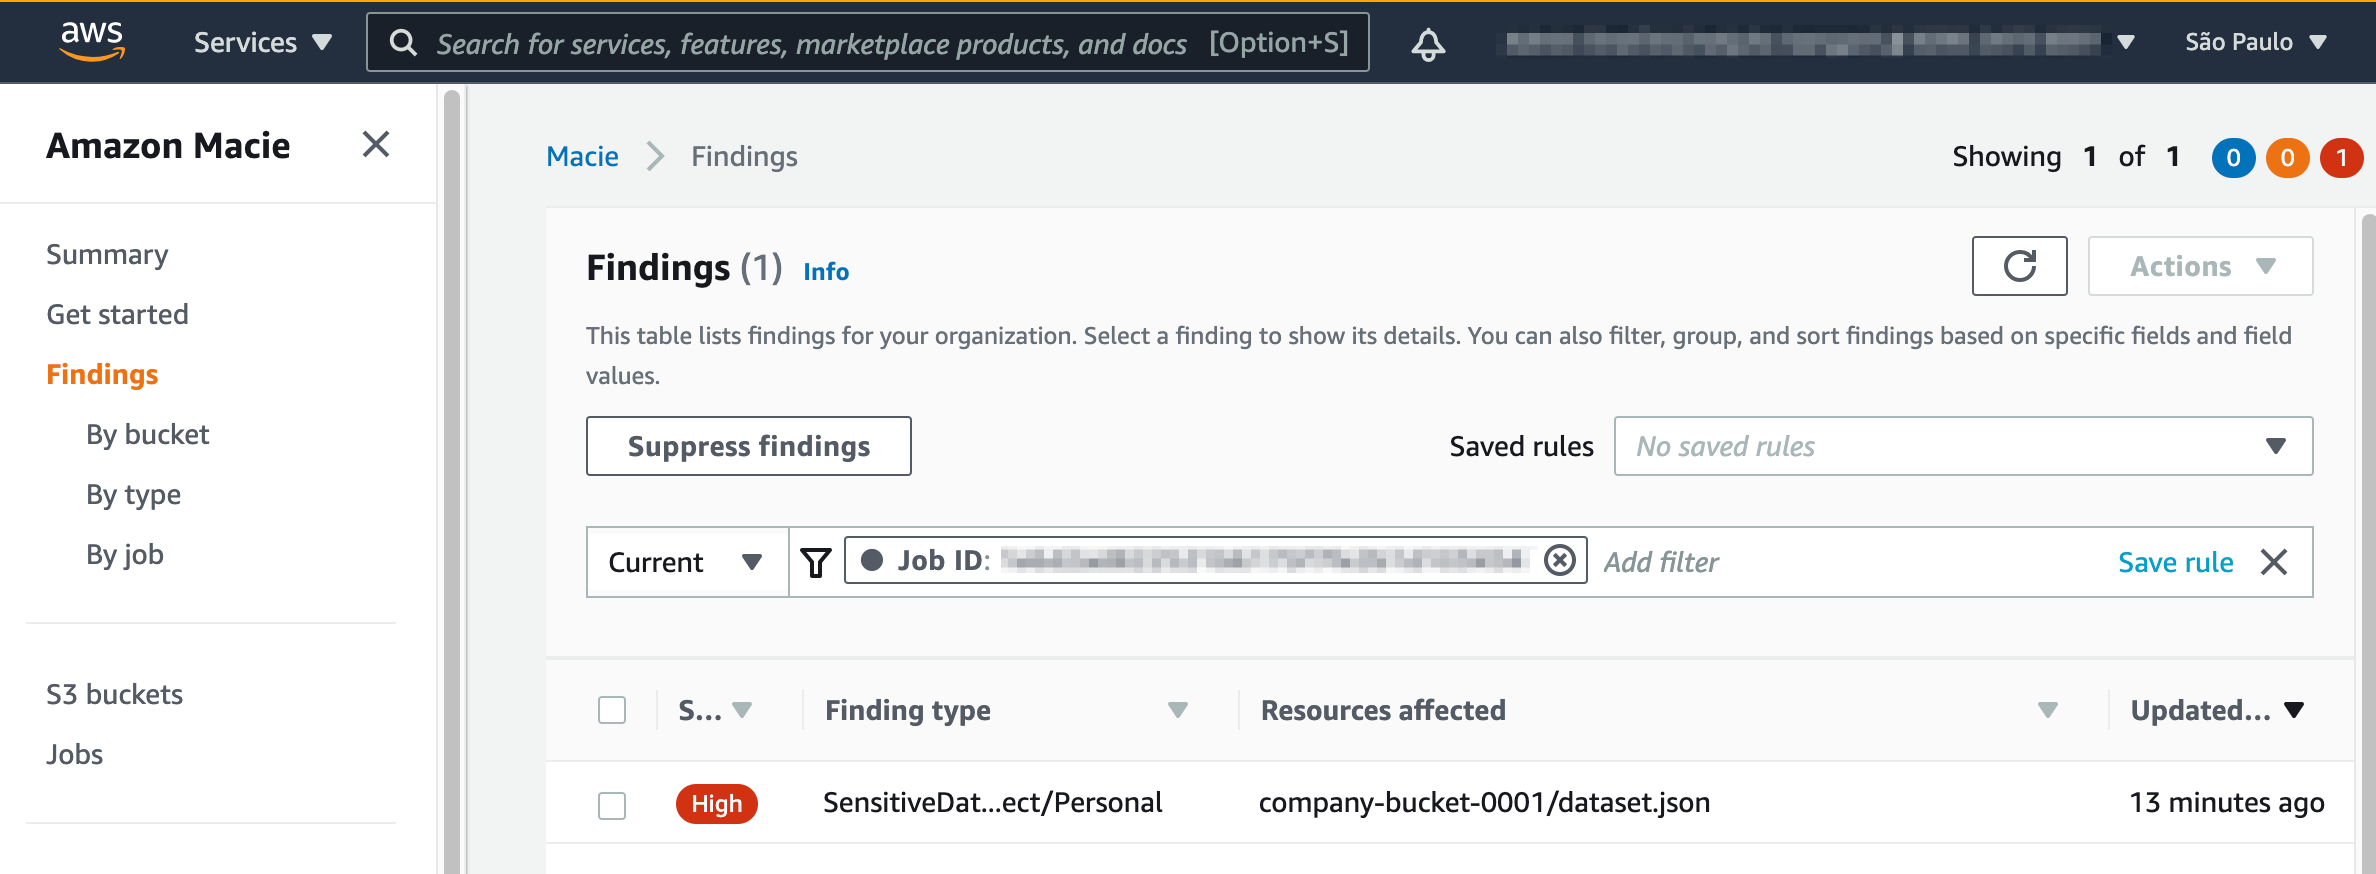
Select the link in the message sent to the Slack channel to open that finding in the Macie console, as shown in Figure 5.

Figure 5: Finding details
And you’re done!
Now your Macie finding results are delivered to your Slack channel where they can be easily monitored, reducing response time and risk exposure.
If you deployed this for testing purposes, or want to clean this up and move to your production account, you can delete the Cloudformation stack:
- Open the CloudFormation console.
- Select the stack and choose Delete.
Conclusion
In this blog post we walked through the steps to configure a notification workflow using Macie, Lambda, and EventBridge to send sensitive data findings to your data protection team via a Slack channel.
Your data protection team will appreciate the timely notifications of sensitive data findings, giving you the ability to focus on creating controls to improve data security and compliance with regulations related to protection and treatment of personal data.
For more information about data privacy on AWS, see Data Privacy FAQ.
If you have feedback about this post, submit comments in the Comments section below.
Want more AWS Security how-to content, news, and feature announcements? Follow us on Twitter.