AWS Feed
Use new account assignment APIs for AWS SSO to automate multi-account access
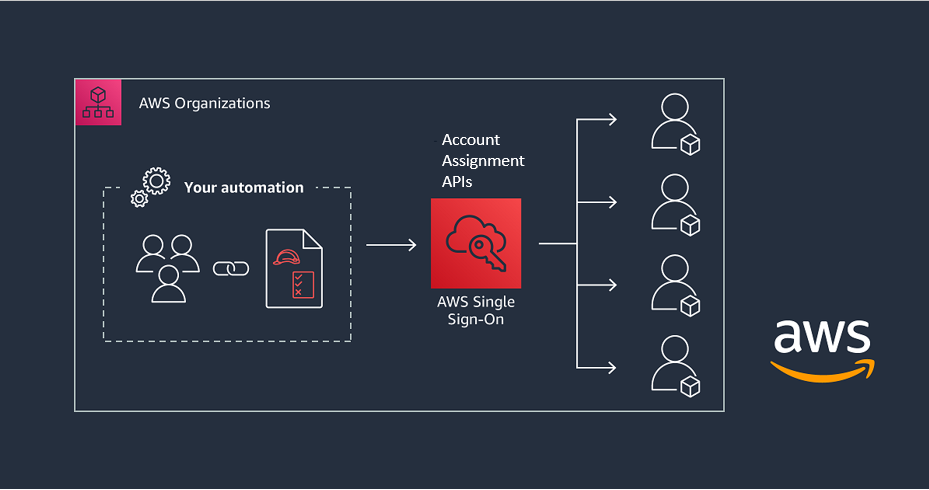
In this blog post, we’ll show how you can programmatically assign and audit access to multiple AWS accounts for your AWS Single Sign-On (SSO) users and groups, using the AWS Command Line Interface (AWS CLI) and AWS CloudFormation.
With AWS SSO, you can centrally manage access and user permissions to all of your accounts in AWS Organizations. You can assign user permissions based on common job functions, customize them to meet your specific security requirements, and assign the permissions to users or groups in the specific accounts where they need access. You can create, read, update, and delete permission sets in one place to have consistent role policies across your entire organization. You can then provide access by assigning permission sets to multiple users and groups in multiple accounts all in a single operation.
AWS SSO recently added new account assignment APIs and AWS CloudFormation support to automate access assignment across AWS Organizations accounts. This release addressed feedback from our customers with multi-account environments who wanted to adopt AWS SSO, but faced challenges related to managing AWS account permissions. To automate the previously manual process and save your administration time, you can now use the new AWS SSO account assignment APIs, or AWS CloudFormation templates, to programmatically manage AWS account permission sets in multi-account environments.
With AWS SSO account assignment APIs, you can now build your automation that will assign access for your users and groups to AWS accounts. You can also gain insights into who has access to which permission sets in which accounts across your entire AWS Organizations structure. With the account assignment APIs, your automation system can programmatically retrieve permission sets for audit and governance purposes, as shown in Figure 1.

Figure 1: Automating multi-account access with the AWS SSO API and AWS CloudFormation
Overview
In this walkthrough, we’ll illustrate how to create permission sets, assign permission sets to users and groups in AWS SSO, and grant access for users and groups to multiple AWS accounts by using the AWS Command Line Interface (AWS CLI) and AWS CloudFormation.
To grant user permissions to AWS resources with AWS SSO, you use permission sets. A permission set is a collection of AWS Identity and Access Management (IAM) policies. Permission sets can contain up to 10 AWS managed policies and a single custom policy stored in AWS SSO.
A policy is an object that defines a user’s permissions. Policies contain statements that represent individual access controls (allow or deny) for various tasks. This determines what tasks users can or cannot perform within the AWS account. AWS evaluates these policies when an IAM principal (a user or role) makes a request.
When you provision a permission set in the AWS account, AWS SSO creates a corresponding IAM role on that account, with a trust policy that allows users to assume the role through AWS SSO. With AWS SSO, you can assign more than one permission set to a user in the specific AWS account. Users who have multiple permission sets must choose one when they sign in through the user portal or the AWS CLI. Users will see these as IAM roles.
To learn more about IAM policies, see Policies and permissions in IAM. To learn more about permission sets, see Permission Sets.
Assume you have a company, Example.com, which has three AWS accounts: an organization management account (ExampleOrgMaster), a development account (ExampleOrgDev), and a test account (ExampleOrgTest). Example.com uses AWS Organizations to manage these accounts and has already enabled AWS SSO.
Example.com has the IT security lead, Frank Infosec, who needs PowerUserAccess to the test account (ExampleOrgTest) and SecurityAudit access to the development account (ExampleOrgDev). Alice Developer, the developer, needs full access to Amazon Elastic Compute Cloud (Amazon EC2) and Amazon Simple Storage Service (Amazon S3) through the development account (ExampleOrgDev). We’ll show you how to assign and audit the access for Alice and Frank centrally with AWS SSO, using the AWS CLI.
The flow includes the following steps:
- Create three permission sets:
- PowerUserAccess, with the PowerUserAccess policy attached.
- AuditAccess, with the SecurityAudit policy attached.
- EC2-S3-FullAccess, with the AmazonEC2FullAccess and AmazonS3FullAccess policies attached.
- Assign permission sets to the AWS account and AWS SSO users:
- Assign the PowerUserAccess and AuditAccess permission sets to Frank Infosec, to provide the required access to the ExampleOrgDev and ExampleOrgTest accounts.
- Assign the EC2-S3-FullAccess permission set to Alice Developer, to provide the required permissions to the ExampleOrgDev account.
- Retrieve the assigned permissions by using Account Entitlement APIs for audit and governance purposes.
Note: AWS SSO Permission sets can contain either AWS managed policies or custom policies that are stored in AWS SSO. In this blog we attach AWS managed polices to the AWS SSO Permission sets for simplicity. To help secure your AWS resources, follow the standard security advice of granting least privilege access using AWS SSO custom policy while creating AWS SSO Permission set.
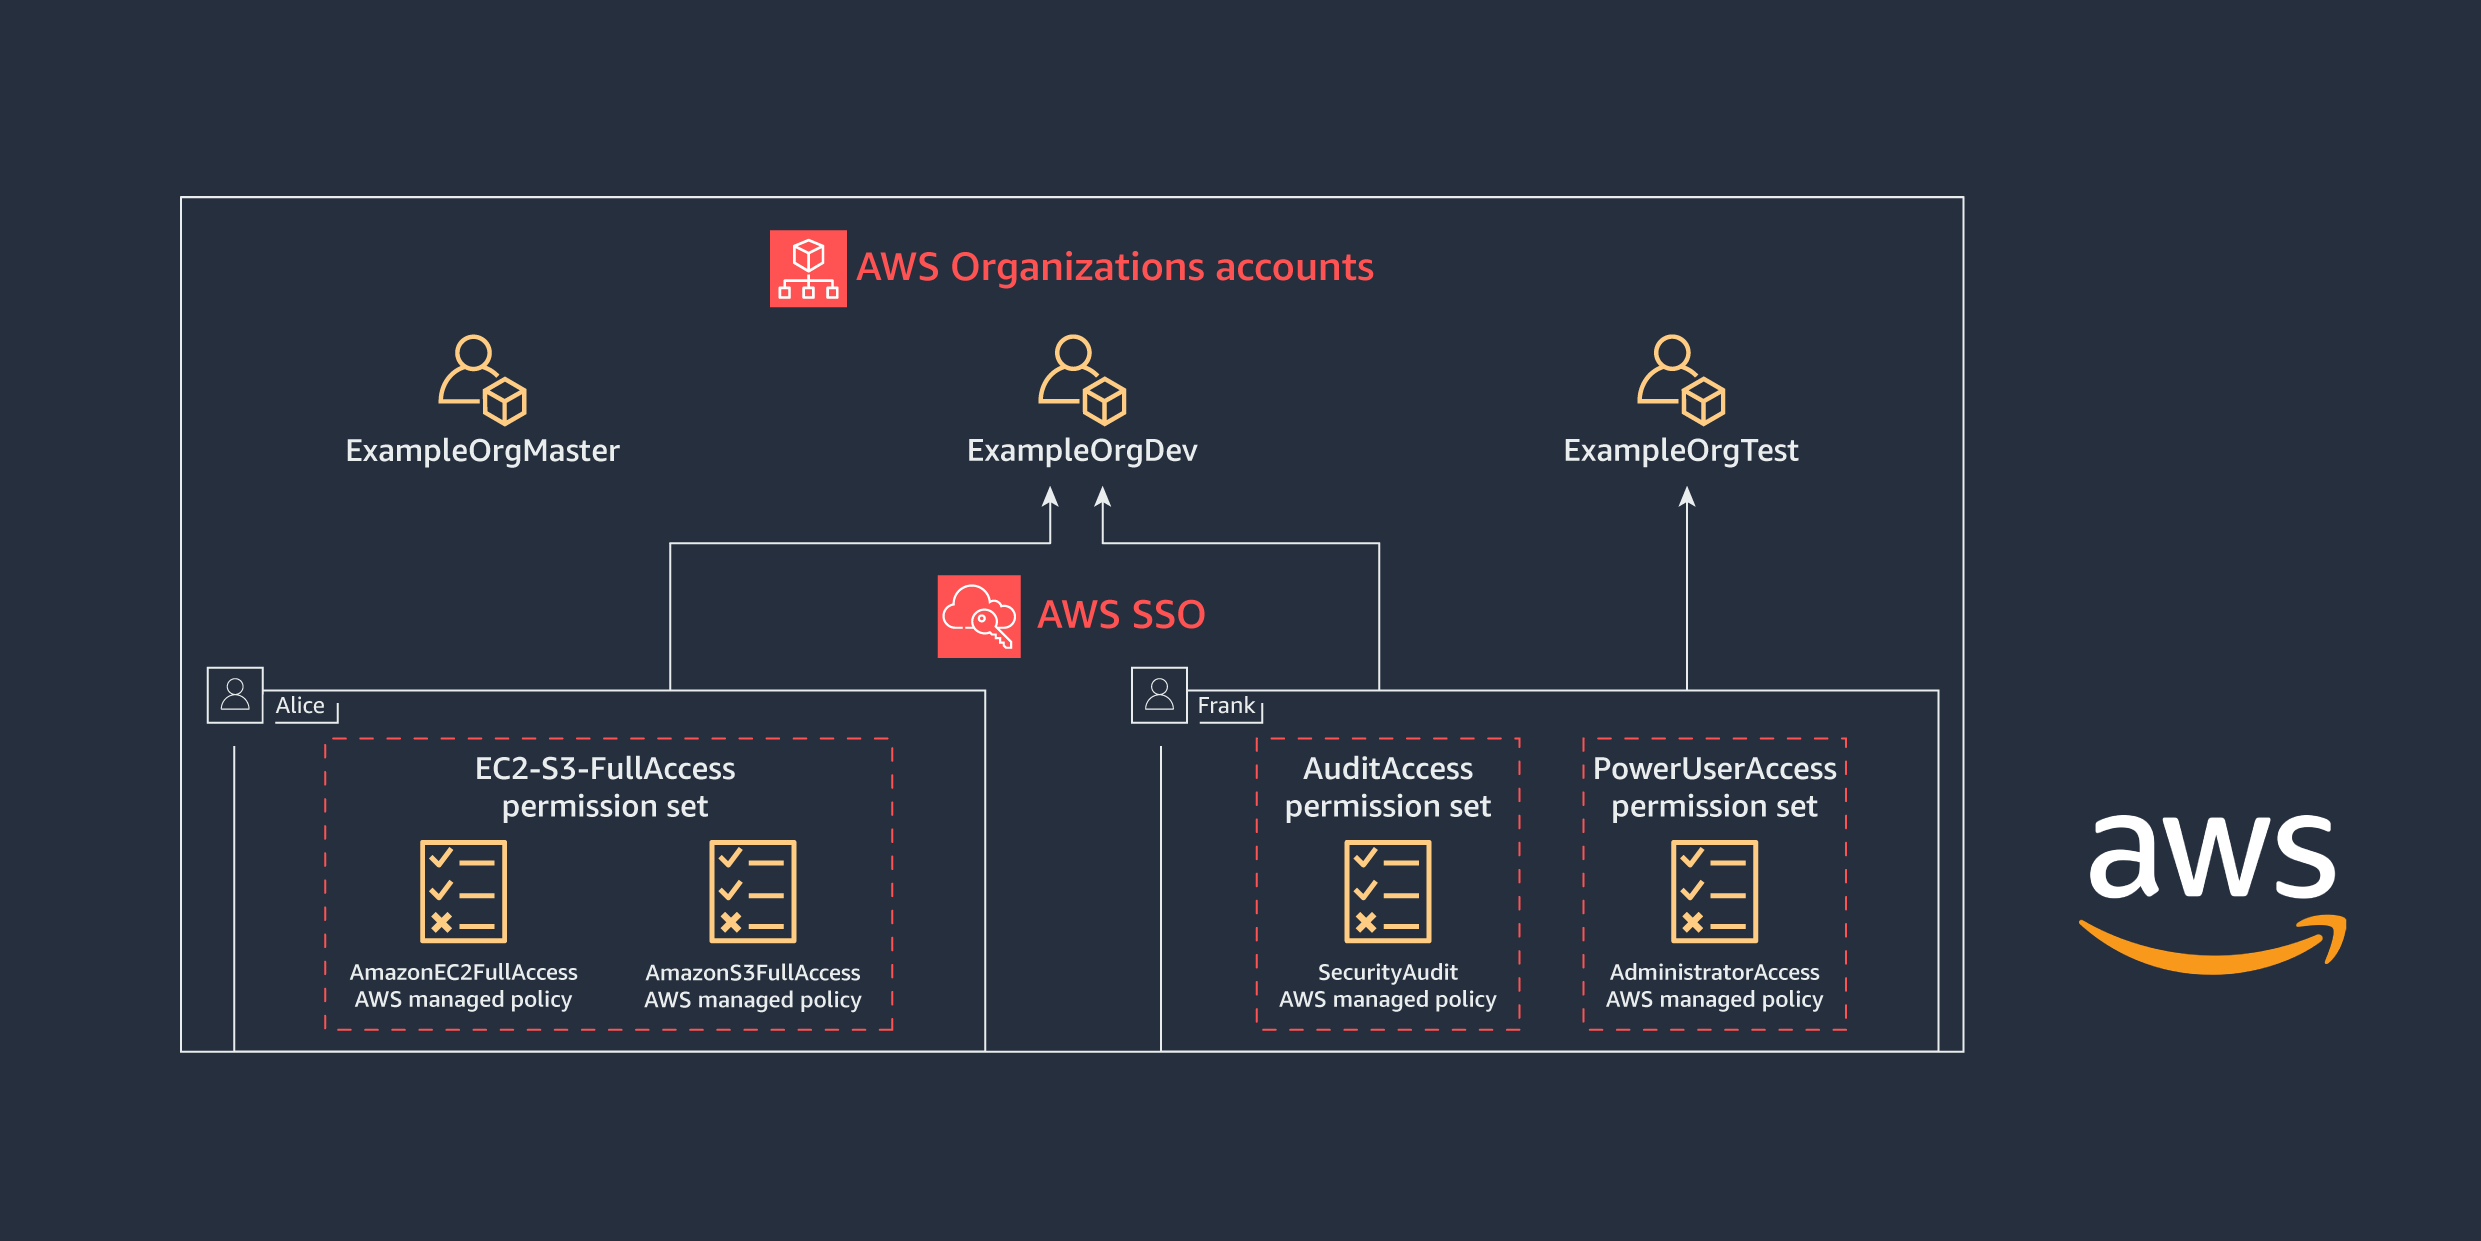
Figure 2: AWS Organizations accounts access for Alice and Frank
To help simplify administration of access permissions, we recommend that you assign access directly to groups rather than to individual users. With groups, you can grant or deny permissions to groups of users, rather than having to apply those permissions to each individual. For simplicity, in this blog you’ll assign permissions directly to the users.
Prerequisites
Before you start this walkthrough, complete these steps:
- Identify the AWS accounts to which you want to grant AWS SSO access, and add them to your organization. To learn more, see Managing the AWS accounts in your organization.
- Get the permissions that are required to use the AWS SSO console. To learn more, see Permissions Required to Use the AWS SSO Console.
- Sign in to the AWS Organizations management account AWS Management Console with AWS SSO administrator credentials. To learn more about AWS Organizations and the management account, see AWS Organizations FAQs.
- Enable AWS SSO for your AWS Organizations structure. To learn more, see Enable AWS SSO.
- Have your users and groups provisioned in AWS SSO. You can manage your users and groups in AWS SSO internal identity store, connect AWS SSO to your Microsoft Active Directory or integrate with an external identity provider using SAML 2.0 and SCIM 2.0. To learn more about AWS SSO identity store options, see Manage Your Identity Source.
Use the AWS SSO API from the AWS CLI
In order to call the AWS SSO account assignment API by using the AWS CLI, you need to install and configure AWS CLI v2. For more information about AWS CLI installation and configuration, see Installing the AWS CLI and Configuring the AWS CLI.
Step 1: Create permission sets
In this step, you learn how to create EC2-S3FullAccess, AuditAccess, and PowerUserAccess permission sets in AWS SSO from the AWS CLI.
Before you create the permission sets, run the following command to get the Amazon Resource Name (ARN) of the AWS SSO instance and the Identity Store ID, which you will need later in the process when you create and assign permission sets to AWS accounts and users or groups.
Figure 3 shows the results of running the command.

Figure 3: AWS SSO list instances
Next, create the permission set for the security team (Frank) and dev team (Alice), as follows.
Permission set for Alice Developer (EC2-S3-FullAccess)
Run the following command to create the EC2-S3-FullAccess permission set for Alice, as shown in Figure 4.

Figure 4: Creating the permission set EC2-S3-FullAccess
Permission set for Frank Infosec (AuditAccess)
Run the following command to create the AuditAccess permission set for Frank, as shown in Figure 5.

Figure 5: Creating the permission set AuditAccess
Permission set for Frank Infosec (PowerUserAccess)
Run the following command to create the PowerUserAccess permission set for Frank, as shown in Figure 6.

Figure 6: Creating the permission set PowerUserAccess
Copy the permission set ARN from these responses, which you will need when you attach the managed policies.
Step 2: Assign policies to permission sets
In this step, you learn how to assign managed policies to the permission sets that you created in step 1.
Attach policies to the EC2-S3-FullAccess permission set
Run the following command to attach the amazonec2fullacess AWS managed policy to the EC2-S3-FullAccess permission set, as shown in Figure 7.

Figure 7: Attaching the AWS managed policy amazonec2fullaccess to the EC2-S3-FullAccess permission set
Run the following command to attach the amazons3fullaccess AWS managed policy to the EC2-S3-FullAccess permission set, as shown in Figure 8.

Figure 8: Attaching the AWS managed policy amazons3fullaccess to the EC2-S3-FullAccess permission set
Attach a policy to the AuditAccess permission set
Run the following command to attach the SecurityAudit managed policy to the AuditAccess permission set that you created earlier, as shown in Figure 9.

Figure 9: Attaching the AWS managed policy SecurityAudit to the AuditAccess permission set
Attach a policy to the PowerUserAccess permission set
The following command is similar to the previous command; it attaches the PowerUserAccess managed policy to the PowerUserAccess permission set, as shown in Figure 10.

Figure 10: Attaching AWS managed policy PowerUserAccess to the PowerUserAccess permission set
In the next step, you assign users (Frank Infosec and Alice Developer) to their respective permission sets and assign permission sets to accounts.
Step 3: Assign permission sets to users and groups and grant access to AWS accounts
In this step, you assign the AWS SSO permission sets you created to users and groups and AWS accounts, to grant the required access for these users and groups on respective AWS accounts.
To assign access to an AWS account for a user or group, using a permission set you already created, you need the following:
- The principal ID (the ID for the user or group)
- The AWS account ID to which you need to assign this permission set
To obtain a user’s or group’s principal ID (UserID or GroupID), you need to use the AWS SSO Identity Store API. The AWS SSO Identity Store service enables you to retrieve all of your identities (users and groups) from AWS SSO. See AWS SSO Identity Store API for more details.
Use the first two commands shown here to get the principal ID for the two users, Alice (Alice’s user name is alice@example.com) and Frank (Frank’s user name is frank@example.com).
Alice’s user ID
Run the following command to get Alice’s user ID, as shown in Figure 11.

Figure 11: Retrieving Alice’s user ID
Frank’s user ID
Run the following command to get Frank’s user ID, as shown in Figure 12.

Figure 12: Retrieving Frank’s user ID
Note: To get the principal ID for a group, use the following command.
Assign the EC2-S3-FullAccess permission set to Alice in the ExampleOrgDev account
Run the following command to assign Alice access to the ExampleOrgDev account using the EC2-S3-FullAccess permission set. This will give Alice full access to Amazon EC2 and S3 services in the ExampleOrgDev account.
Note: When you call the CreateAccountAssignment API, AWS SSO automatically provisions the specified permission set on the account in the form of an IAM policy attached to the AWS SSO–created IAM role. This role is immutable: it’s fully managed by the AWS SSO, and it cannot be deleted or changed by the user even if the user has full administrative rights on the account. If the permission set is subsequently updated, the corresponding IAM policies attached to roles in your accounts won’t be updated automatically. In this case, you will need to call ProvisionPermissionSet to propagate these updates.

Figure 13: Assigning the EC2-S3-FullAccess permission set to Alice on the ExampleOrgDev account
Assign the AuditAccess permission set to Frank Infosec in the ExampleOrgDev account
Run the following command to assign Frank access to the ExampleOrgDev account using the EC2-S3- AuditAccess permission set.

Figure 14: Assigning the AuditAccess permission set to Frank on the ExampleOrgDev account
Assign the PowerUserAccess permission set to Frank Infosec in the ExampleOrgTest account
Run the following command to assign Frank access to the ExampleOrgTest account using the PowerUserAccess permission set.

Figure 15: Assigning the PowerUserAccess permission set to Frank on the ExampleOrgTest account
To view the permission sets provisioned on the AWS account, run the following command, as shown in Figure 16.

Figure 16: View the permission sets (AuditAccess and EC2-S3-FullAccess) assigned to the ExampleOrgDev account
To review the created resources in the AWS Management Console, navigate to the AWS SSO console. In the list of permission sets on the AWS accounts tab, choose the EC2-S3-FullAccess permission set. Under AWS managed policies, the policies attached to the permission set are listed, as shown in Figure 17.
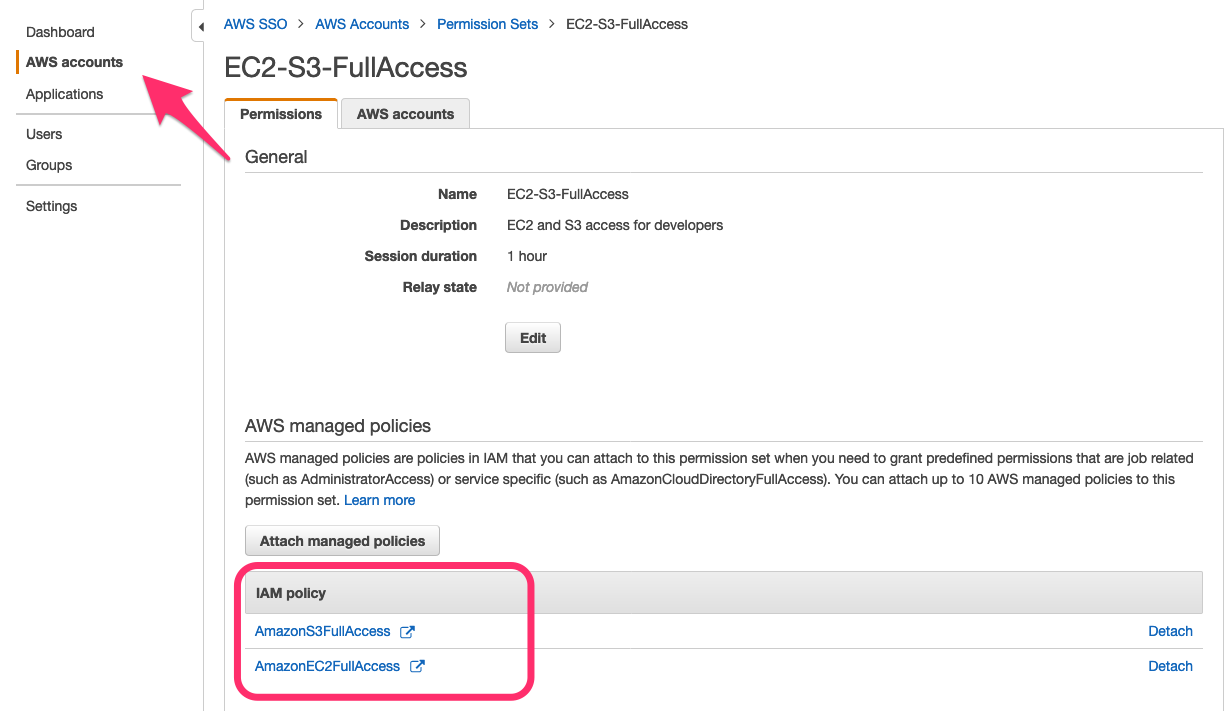
Figure 17: Review the permission set in the AWS SSO console
To see the AWS accounts, where the EC2-S3-FullAccess permission set is currently provisioned, navigate to the AWS accounts tab, as shown in Figure 18.
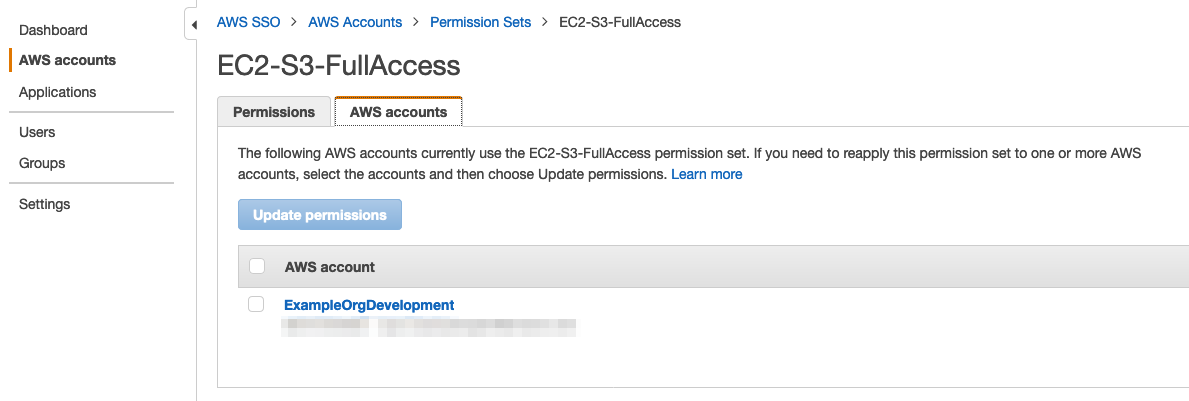
Figure 18: Review permission set account assignment in the AWS SSO console
Step 4: Audit access
In this step, you learn how to audit access assigned to your users and group by using the AWS SSO account assignment API. In this example, you’ll start from a permission set, review the permissions (AWS-managed policies or a custom policy) attached to the permission set, get the users and groups associated with the permission set, and see which AWS accounts the permission set is provisioned to.
List the IAM managed policies for the permission set
Run the following command to list the IAM managed policies that are attached to a specified permission set, as shown in Figure 19.

Figure 19: View the managed policies attached to the permission set
List the assignee of the AWS account with the permission set
Run the following command to list the assignee (the user or group with the respective principal ID) of the specified AWS account with the specified permission set, as shown in Figure 20.

Figure 20: View the permission set and the user or group attached to the AWS account
List the accounts to which the permission set is provisioned
Run the following command to list the accounts that are associated with a specific permission set, as shown in Figure 21.

Figure 21: View AWS accounts to which the permission set is provisioned
In this section of the post, we’ve illustrated how to create a permission set, assign a managed policy to the permission set, and grant access for AWS SSO users or groups to AWS accounts by using this permission set. In the next section, we’ll show you how to do the same using AWS CloudFormation.
Use the AWS SSO API through AWS CloudFormation
In this section, you learn how to use CloudFormation templates to automate the creation of permission sets, attach managed policies, and use permission sets to assign access for a particular user or group to AWS accounts.
Sign in to your AWS Management Console and create a CloudFormation stack by using the following CloudFormation template. For more information on how to create a CloudFormation stack, see Creating a stack on the AWS CloudFormation console.
When you create the stack, provide the following information for setting the example permission sets for Frank Infosec and Alice Developer, as shown in Figure 22:
- The Alice Developer and Frank Infosec user IDs
- The ExampleOrgDev and ExampleOrgTest account IDs
- The AWS SSO instance ARN
Then launch the CloudFormation stack.
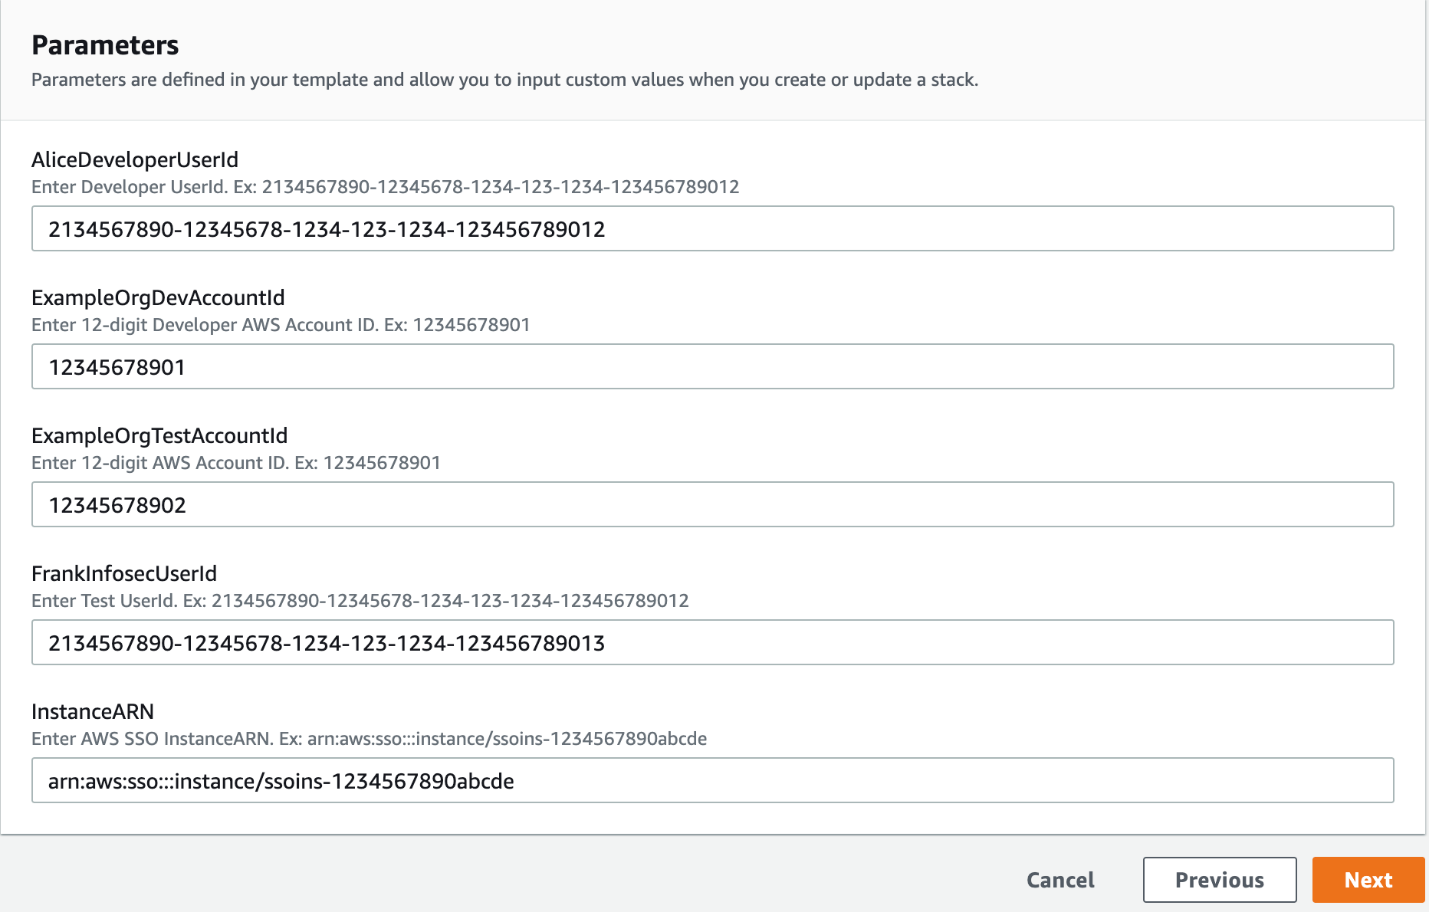
Figure 22: User inputs to launch the CloudFormation template
AWS CloudFormation creates the resources that are shown in Figure 23.
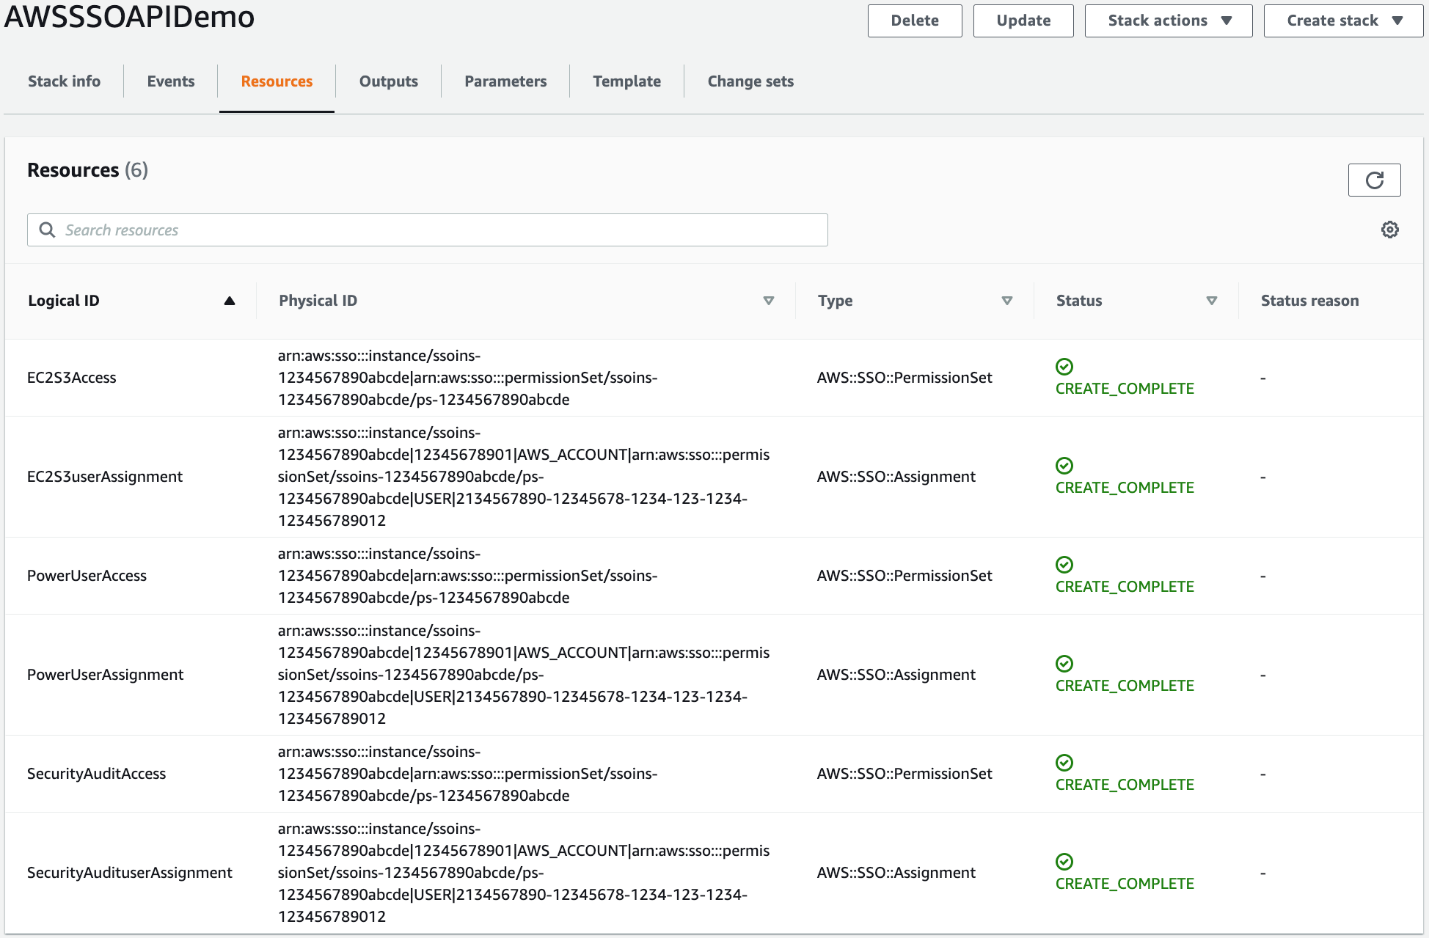
Figure 23: Resources created from the CloudFormation stack
Cleanup
To delete the resources you created by using the AWS CLI, use these commands.
Run the following command to delete the account assignment.
After the account assignment is deleted, run the following command to delete the permission set.
To delete the resource that you created by using the CloudFormation template, go to the AWS CloudFormation console. Select the appropriate stack you created, and then choose delete. Deleting the CloudFormation stack cleans up the resources that were created.
Summary
In this blog post, we showed how to use the AWS SSO account assignment API to automate the deployment of permission sets, how to add managed policies to permission sets, and how to assign access for AWS users and groups to AWS accounts by using specified permission sets.
To learn more about the AWS SSO APIs available for you, see the AWS Single Sign-On API Reference Guide.
If you have feedback about this post, submit comments in the Comments section below. If you have questions about this post, start a new thread on the AWS SSO forum or contact AWS Support.
Want more AWS Security how-to content, news, and feature announcements? Follow us on Twitter.