AWS Feed
Using API destinations with Amazon EventBridge

Amazon EventBridge enables developers to route events between AWS services, integrated software as a service (SaaS) applications, and your own applications. It can help decouple applications and produce more extensible, maintainable architectures. With the new API destinations feature, EventBridge can now integrate with services outside of AWS using REST API calls.
This feature enables developers to route events to existing SaaS providers that integrate with EventBridge, like Zendesk, PagerDuty, TriggerMesh, or MongoDB. Additionally, you can use other SaaS endpoints for applications like Slack or Contentful, or any other type of API or webhook. It can also provide an easier way to ingest data from serverless workloads into Splunk without needing to modify application code or install agents.
This blog post explains how to use API destinations and walks through integration examples you can use in your workloads.
How it works
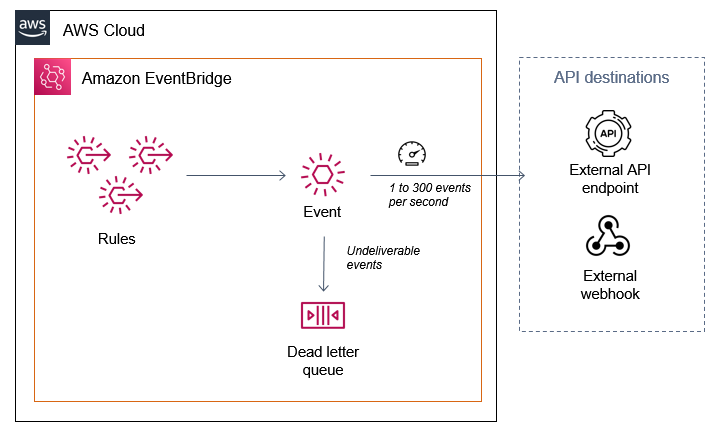
API destinations are third-party targets outside of AWS that you can invoke with an HTTP request. EventBridge invokes the HTTP endpoint and delivers the event as a payload within the request. You can use any preferred HTTP method, such as GET or POST. You can use input transformers to change the payload format to match your target.
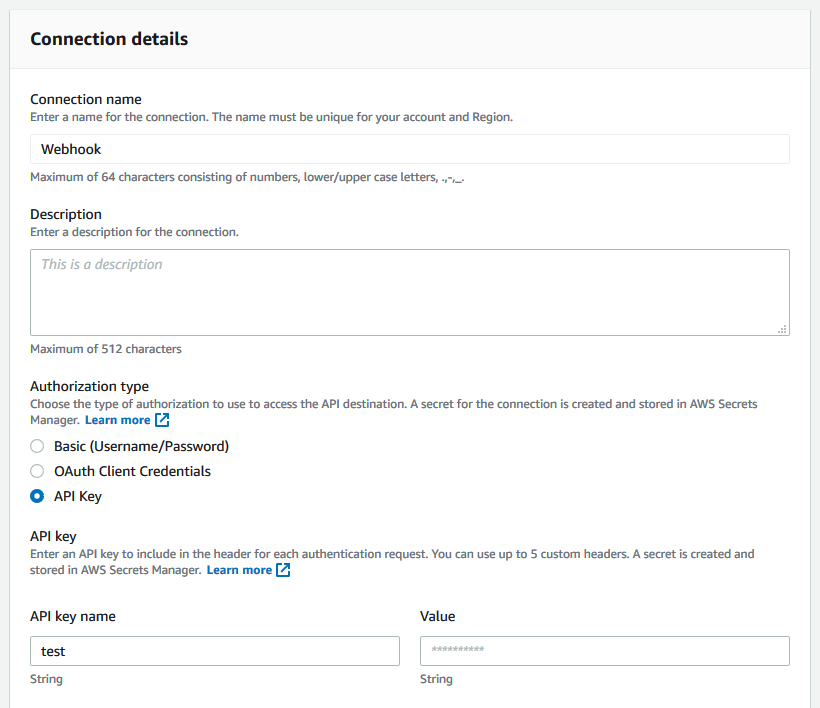
An API destination uses a Connection to manage the authentication credentials for a target. This defines the authorization type used, which can be an API key, OAuth client credentials grant, or a basic user name and password.
The service manages the secret in AWS Secrets Manager and the cost of storing the secret is included in the pricing for API destinations.
You create a connection to each different external API endpoint and share the connection with multiple endpoints. The API destinations console shows all configured connections, together with their authorization status. Any connections that cannot be established are shown here:
To create an API destination, you provide a name, the HTTP endpoint and method, and the connection:
When you configure the destination, you must also set an invocation rate limit between 1 and 300 events per second. This helps protect the downstream endpoint from surges in traffic. If the number of arriving events exceeds the limit, the EventBridge service queues up events. It delivers to the endpoint as quickly as possible within the rate limit.
It continues to do this for 24 hours. To make sure you retain any events that cannot be delivered, set up a dead-letter queue on the event bus. This ensures that if the event is not delivered within this timeframe, it is stored durably in an Amazon SQS queue for further processing. This can also be useful if the downstream API experiences an outage for extended periods of time.
Once you have configured the API destination, it becomes available in the list of targets for rules. Matching events are sent to the HTTP endpoint with the event serialized as part of the payload.
As with API Gateway targets in EventBridge, the maximum timeout for API destination is 5 seconds. If an API call exceeds this timeout, it is retried.
Debugging the payload from API destinations
You can send an event via API Destinations to debugging tools like Webhook.site to view the headers and payload of the API call:
- Create a connection with the credential, such as an API key.

- Create an API destination with the webhook URL endpoint and then create a rule to match and route events.

- The Webhook.site testing service shows the headers and payload once the webhook is triggered. This can help you test rules if you are adding headers or manipulating the payload using an input transformer.

Customizing the payload
Third-party APIs often require custom headers or payload formats when accepting data. EventBridge rules allow you to customize header parameters, query strings, and payload formats without the need for custom code. Header parameters and query strings can be configured with static values or attributes from the event:
To customize the payload, configure an input transformer, which consists of an Input Path and Input template. You use an Input Path to define variables and use JSONPath query syntax to identify the variable source in the event. For example, to extract two attributes from an Amazon S3 PutObject event, the Input Path is:
{ "key" : "$.[0].s3.object.key", "bucket" : " $.[0].s3.bucket.name "
}
Next, the Input template defines the structure of the data passed to the target, which references the variables. With this release you can now use variables inside quotes in the input transformer. As a result, you can pass these values as a string or JSON, for example:
{ "filename" : "<key>", "container" : "mycontainer-<bucket>"
}
Sending AWS events to DataDog
Using API destinations, you can send any AWS-sourced event to third-party services like DataDog. This approach uses the DataDog API to put data into the service. To do this, you must sign up for an account and create an API key. In this example, I send S3 events via CloudTrail to DataDog for further analysis.
- Navigate to the EventBridge console, select API destinations from the menu.
- Select the Connections tab and choose Create connection:

- Enter a connection name, then select API Key for Authorization Type. Enter the API key name DD-API-KEY and paste your secret API key as the value. Choose Create.

- In the API destinations tab, choose Create API destination.

- Enter a name, set the API destination endpoint to
https://http-intake.logs.datadoghq.com/v1/input, and the HTTP method to POST. Enter 300 for Invocation rate limit and select the DataDog connection from the dropdown. Choose Create.
- From the EventBridge console, select Rules and choose Create rule. Enter a name, select the default bus, and enter this event pattern:
{ "source": ["aws.s3"] } - In Select targets, choose API destination and select DataDog for the API destination. Expand, Configure Input.
- In the Input transformer section, enter
{"detail":"$.detail"}in the Input Path field and enter{"message": <detail>}in the Input Template.
- You can optionally add a dead letter queue. To do this, open the Retry policy and dead-letter queue section. Under Dead-letter queue, select an existing SQS queue.

- Choose Create.
- Open AWS CloudShell and upload an object to an S3 bucket in your account to trigger an event:
echo "test" > testfile.txt aws s3 cp testfile.txt s3://YOUR_BUCKET_NAME - The logs appear in the DataDog Logs console, where you can process the raw data for further analysis:

Sending AWS events to Zendesk
Zendesk is a SaaS provider that provides customer support solutions. It can already send events to EventBridge using a partner integration. This post shows how you can consume ticket events from Zendesk and run a sentiment analysis using Amazon Comprehend.
With API destinations, you can now use events to call the Zendesk API to create and modify tickets and interact with chats and customer profiles.
To create an API destination for Zendesk:
- Log in with an existing Zendesk account or register for a trial account.
- Navigate to the EventBridge console, select API destinations from the menu and choose Create API destination.
- On the Create API destination, page:
- Enter a name for the destination (e.g. “SendToZendesk”).
- For API destination endpoint, enter
https://<<your-subdomain>>.zendesk.com/api/v2/tickets.json. - For HTTP method, select POST.
- For Invocation rate, enter 10.
- In the connection section:
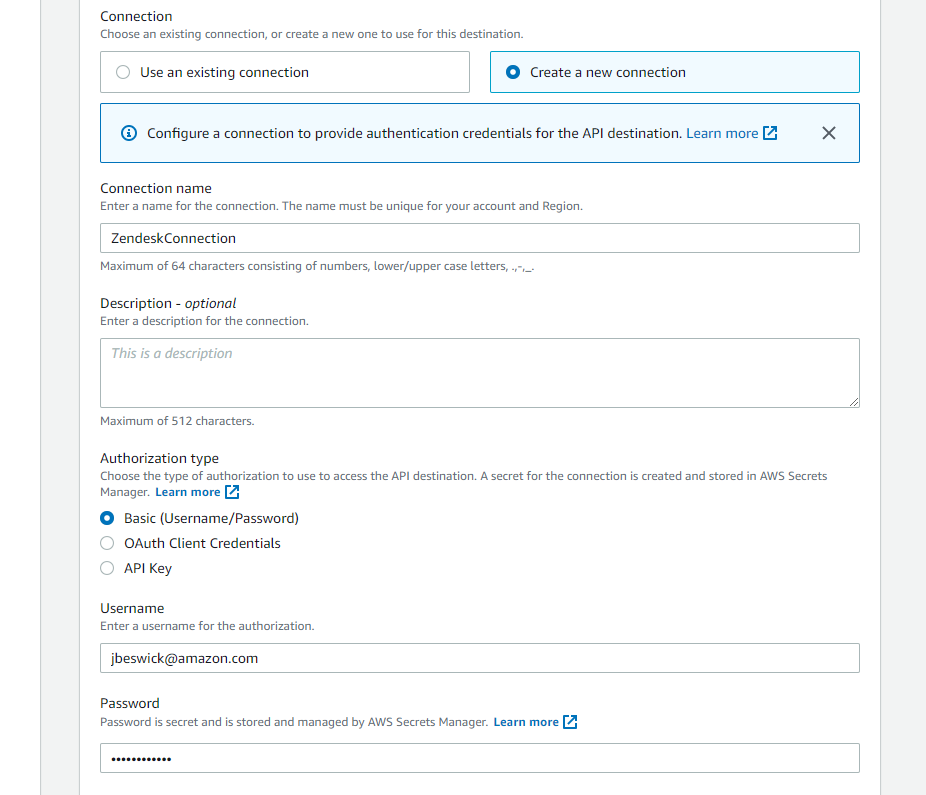
- Select the Create a new connection radio button.
- For Connection name, enter ZendeskConnection.
- For Authorization type, select Basic (Username/Password).
- Enter your Zendesk username and password.
- Choose Create.

When you create a rule to route to this API destination, use the Input transformer to build the defined JSON payload, as shown in the previous DataDog example. When an event matches the rule, EventBridge calls the Zendesk Create Ticket API. The new ticket appears in the Zendesk dashboard:
For more information on the Zendesk API, visit the Zendesk Developer Portal.
Building an integration with AWS CloudFormation and AWS SAM
To support this new feature, there are two new AWS CloudFormation resources available. These can also be used in AWS Serverless Application Model (AWS SAM) templates:
- The API destination resource is represented by AWS::Events::ApiDestination.
- The connection resource is represented by AWS::Events::Connection.
The connection resource defines the connection credential and optional invocation HTTP parameters:
Resources: TestConnection: Type: AWS::Events::Connection Properties: AuthorizationType: API_KEY Description: 'My connection with an API key' AuthParameters: ApiKeyAuthParameters: ApiKeyName: VHS ApiKeyValue: Testing InvocationHttpParameters: BodyParameters: - Key: 'my-integration-key' Value: 'ABCDEFGH0123456' Outputs: TestConnectionName: Value: !Ref TestConnection TestConnectionArn: Value: !GetAtt TestConnection.Arn
The API destination resource provides the connection, endpoint, HTTP method, and invocation limit:
Resources: TestApiDestination: Type: AWS::Events::ApiDestination Properties: Name: 'datadog-target' ConnectionArn: Fn::GetAtt: [TestConnection, Arn] InvocationEndpoint: 'https://http-intake.logs.datadoghq.com/v1/input' HttpMethod: POST InvocationRateLimitPerSecond: 300 Outputs: TestApiDestinationName: Value: !Ref TestApiDestination TestApiDestinationArn: Value: !GetAtt TestApiDestination.Arn
You can use the existing AWS::Events::Rule resource to configure an input transformer for API destination targets:
ApiDestinationDeliveryRule: Type: AWS::Events::Rule Properties: EventPattern: source: - "EventsForMyAPIdestination" State: "ENABLED" Targets: - Arn: !Ref TestApiDestinationArn InputTransformer: InputPathsMap: detail: $.detail InputTemplate: > { "message": <detail> }
Conclusion
The API destinations feature of EventBridge enables developers to integrate workloads with third-party applications using REST API calls. This provides an easier way to build decoupled, extensible applications that work with applications outside of the AWS Cloud.
To use this feature, you configure a connection and an API destination. You can use API destinations in the same way as existing targets for rules, and also customize headers, query strings, and payloads in the API call.
Learn more about using API destinations with the following SaaS providers: Datadog, Freshworks, MongoDB, TriggerMesh, and Zendesk.
For more serverless learning resources, visit Serverless Land.


