Amazon Web Services Feed
Integrating AWS CloudFormation Guard into CI/CD pipelines
In this post, we discuss and build a managed continuous integration and continuous deployment (CI/CD) pipeline that uses AWS CloudFormation Guard to automate and simplify pre-deployment compliance checks of your AWS CloudFormation templates. This enables your teams to define a single source of truth for what constitutes valid infrastructure definitions, to be compliant with your company guidelines and streamline AWS resources’ deployment lifecycle.
We use the following AWS services and open-source tools to set up the pipeline:
- CloudFormation
- CloudFormation Guard
- AWS CodeBuild
- AWS CodeCommit
- AWS CodePipeline
- AWS Command Line Interface (AWS CLI)
- Amazon Elastic Block Store (Amazon EBS)
- Amazon Elastic Compute Cloud (Amazon EC2)
Solution overview
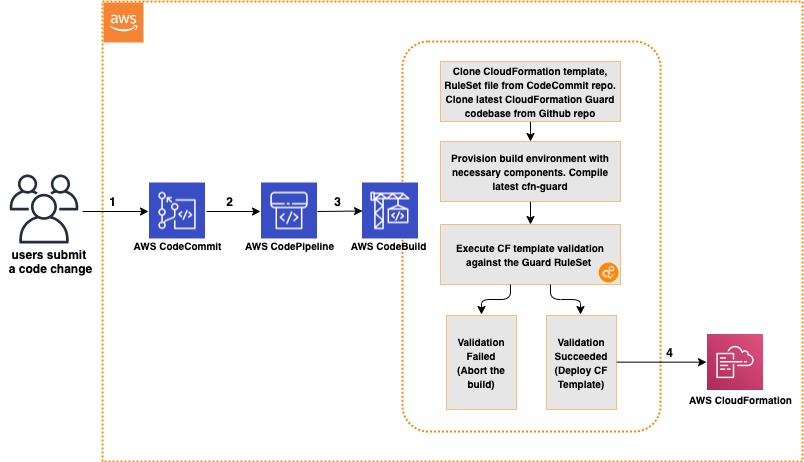
The CI/CD workflow includes the following steps:
- A code change is committed and pushed to the CodeCommit repository.
- CodePipeline automatically triggers a CodeBuild job.
- CodeBuild spins up a compute environment and runs the phases specified in the buildspec.yml file:
- Clone the code from the CodeCommit repository (CloudFormation template, rule set for CloudFormation Guard, buildspec.yml file).
- Clone the code from the CloudFormation Guard repository on GitHub.
- Provision the build environment with necessary components (rust, cargo, git, build-essential).
- Download CloudFormation Guard release from GitHub.
- Run a validation check of the CloudFormation template.
- If the validation is successful, pass the control over to CloudFormation and deploy the stack. If the validation fails, stop the build job and print a summary to the build job log.
The following diagram illustrates this workflow.

Architecture Diagram of CI/CD Pipeline with CloudFormation Guard
Prerequisites
For this walkthrough, complete the following prerequisites:
- Have an AWS account
- Have a clear understanding of CloudFormation Guard
- Configure the AWS CLI
- Configure your credentials for CodeCommit
Creating your CodeCommit repository
Create your CodeCommit repository by running a create-repository command in the AWS CLI:
aws codecommit create-repository --repository-name cfn-guard-demo --repository-description "CloudFormation Guard Demo"
The following screenshot indicates that the repository has been created.

CodeCommit Repository has been created
Populating the CodeCommit repository
Populate your repository with the following artifacts:
- A buildspec.yml file. Modify the following code as per your requirements:
version: 0.2
env: variables: # Definining CloudFormation Teamplate and Ruleset as variables - part of the code repo CF_TEMPLATE: "cfn_template_file_example.yaml" CF_ORG_RULESET: "cfn_guard_ruleset_example"
phases: install: commands: - apt-get update - apt-get install build-essential -y - apt-get install cargo -y - apt-get install git -y pre_build: commands: - echo "Setting up the environment for AWS CloudFormation Guard" - echo "More info https://github.com/aws-cloudformation/cloudformation-guard" - echo "Install Rust" - curl https://sh.rustup.rs -sSf | sh -s -- -y build: commands: - echo "Pull GA release from github" - echo "More info https://github.com/aws-cloudformation/cloudformation-guard/releases" - wget https://github.com/aws-cloudformation/cloudformation-guard/releases/download/1.0.0/cfn-guard-linux-1.0.0.tar.gz - echo "Extract cfn-guard" - tar xvf cfn-guard-linux-1.0.0.tar.gz . post_build: commands: - echo "Validate CloudFormation template with cfn-guard tool" - echo "More information https://github.com/aws-cloudformation/cloudformation-guard/blob/master/cfn-guard/README.md" - cfn-guard-linux/cfn-guard check --rule_set $CF_ORG_RULESET --template $CF_TEMPLATE --strict-checks
artifacts: files: - cfn_template_file_example.yaml name: guard_templates
- An example of a rule set file (cfn_guard_ruleset_example) for CloudFormation Guard. Modify the following code as per your requirements:
#CFN Guard rules set example #List of multiple references
let allowed_azs = [us-east-1a,us-east-1b]
let allowed_ec2_instance_types = [t2.micro,t3.nano,t3.micro]
let allowed_security_groups = [sg-08bbcxxc21e9ba8e6,sg-07b8bx98795dcab2] #EC2 Policies
AWS::EC2::Instance AvailabilityZone IN %allowed_azs
AWS::EC2::Instance ImageId == ami-0323c3dd2da7fb37d
AWS::EC2::Instance InstanceType IN %allowed_ec2_instance_types
AWS::EC2::Instance SecurityGroupIds == ["sg-07b8xxxsscab2"]
AWS::EC2::Instance SubnetId == subnet-0407a7casssse558 #EBS Policies
AWS::EC2::Volume AvailabilityZone == us-east-1a
AWS::EC2::Volume Encrypted == true
AWS::EC2::Volume Size == 50 |OR| AWS::EC2::Volume Size == 100
AWS::EC2::Volume VolumeType == gp2
- An example of a CloudFormation template file (.yaml). Modify the following code as per your requirements:
AWSTemplateFormatVersion: "2010-09-09"
Description: "EC2 instance with encrypted EBS volume for AWS CloudFormation Guard Testing" Resources: EC2Instance: Type: AWS::EC2::Instance Properties: ImageId: 'ami-0323c3dd2da7fb37d' AvailabilityZone: 'us-east-1a' KeyName: "your-ssh-key" InstanceType: 't3.micro' SubnetId: 'subnet-0407a7xx68410e558' SecurityGroupIds: - 'sg-07b8b339xx95dcab2' Volumes: - Device: '/dev/sdf' VolumeId: !Ref EBSVolume Tags: - Key: Name Value: cfn-guard-ec2 EBSVolume: Type: AWS::EC2::Volume Properties: Size: 100 AvailabilityZone: 'us-east-1a' Encrypted: true VolumeType: gp2 Tags: - Key: Name Value: cfn-guard-ebs DeletionPolicy: Snapshot Outputs: InstanceID: Description: The Instance ID Value: !Ref EC2Instance Volume: Description: The Volume ID Value: !Ref EBSVolume
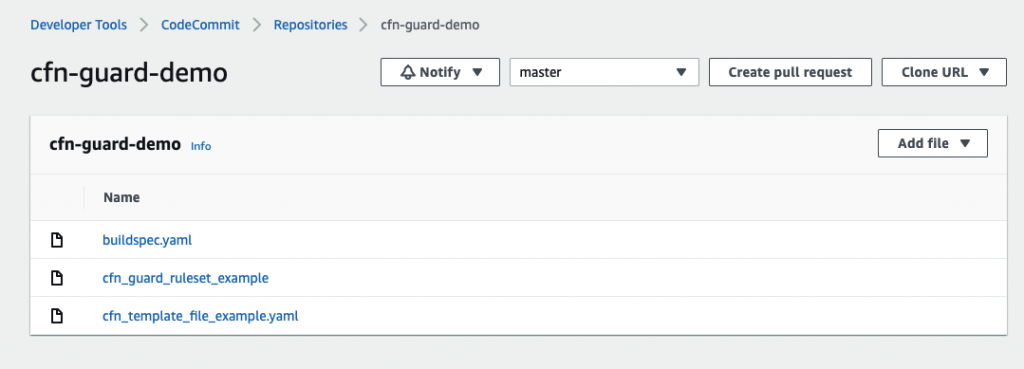
Optional CodeCommit Repository Structure
The following screenshot shows a potential CodeCommit repository structure.
Creating a CodeBuild project
Our CodeBuild project orchestrates around CloudFormation Guard and runs validation checks of our CloudFormation templates as a phase of the CI process.
- On the CodeBuild console, choose Build projects.
- Choose Create build projects.
- For Project name, enter your project name.
- For Description, enter a description.
- For Source provider, choose AWS CodeCommit.
- For Repository, choose the CodeCommit repository you created in the previous step.
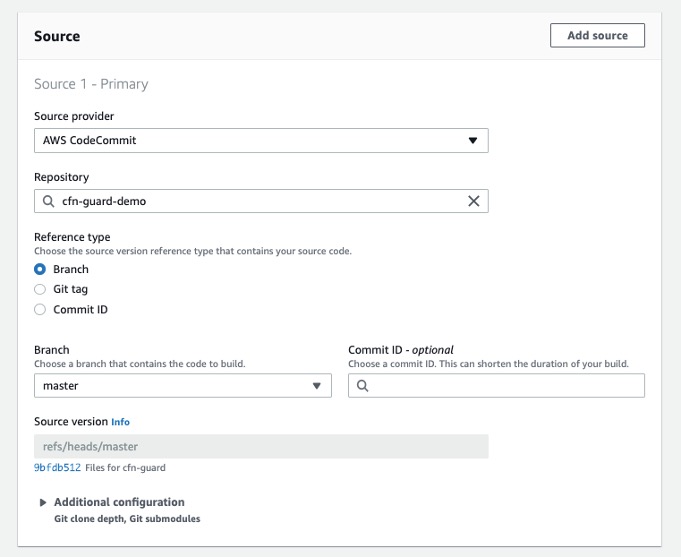
Define the source for your CodeBuild Project
To setup CodeBuild environment we will use managed image based on Ubuntu 18.04
- For Environment Image, select Managed image.
- For Operating system, choose Ubuntu.
- For Service role¸ select New service role.
- For Role name, enter your service role name.
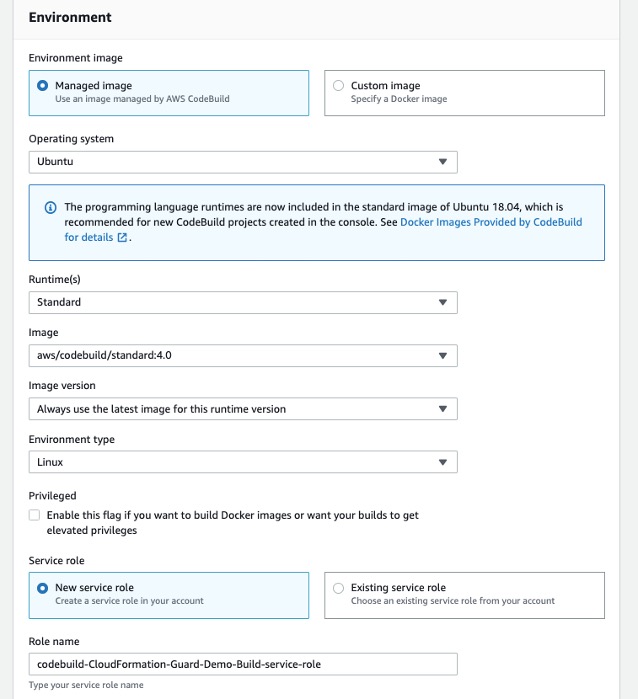
Setup the environment, the OS image and other settings for the CodeBuild
- Leave the default settings for additional configuration, buildspec, batch configuration, artifacts, and logs.
You can also use CodeBuild with custom build environments to help you optimize billing and improve the build time.
Creating IAM roles and policies
Our CI/CD pipeline needs two AWS Identity and Access Management (IAM) roles to run properly: one role for CodePipeline to work with other resources and services, and one role for AWS CloudFormation to run the deployments that passed the validation check in the CodeBuild phase.
Creating permission policies
Create your permission policies first. The following code is the policy in JSON format for CodePipeline:
{ "Version": "2012-10-17", "Statement": [ { "Sid": "VisualEditor0", "Effect": "Allow", "Action": [ "codecommit:UploadArchive", "codecommit:CancelUploadArchive", "codecommit:GetCommit", "codecommit:GetUploadArchiveStatus", "codecommit:GetBranch", "codestar-connections:UseConnection", "codebuild:BatchGetBuilds", "codedeploy:CreateDeployment", "codedeploy:GetApplicationRevision", "codedeploy:RegisterApplicationRevision", "codedeploy:GetDeploymentConfig", "codedeploy:GetDeployment", "codebuild:StartBuild", "codedeploy:GetApplication", "s3:*", "cloudformation:*", "ec2:*" ], "Resource": "*" }, { "Sid": "VisualEditor1", "Effect": "Allow", "Action": "iam:PassRole", "Resource": "*", "Condition": { "StringEqualsIfExists": { "iam:PassedToService": [ "cloudformation.amazonaws.com", "ec2.amazonaws.com" ] } } } ]
}
To create your policy for CodePipeline, run the following CLI command:
aws iam create-policy --policy-name CodePipeline-Cfn-Guard-Demo --policy-document file://CodePipelineServiceRolePolicy_example.json
Capture the policy ARN that you get in the output to use in the next steps.
The following code is the policy in JSON format for AWS CloudFormation:
{ "Version": "2012-10-17", "Statement": [ { "Sid": "VisualEditor0", "Effect": "Allow", "Action": "iam:CreateServiceLinkedRole", "Resource": "*", "Condition": { "StringEquals": { "iam:AWSServiceName": [ "autoscaling.amazonaws.com", "ec2scheduled.amazonaws.com", "elasticloadbalancing.amazonaws.com" ] } } }, { "Sid": "VisualEditor1", "Effect": "Allow", "Action": [ "s3:GetObjectAcl", "s3:GetObject", "cloudwatch:*", "ec2:*", "autoscaling:*", "s3:List*", "s3:HeadBucket" ], "Resource": "*" } ]
}
Create the policy for AWS CloudFormation by running the following CLI command:
aws iam create-policy --policy-name CloudFormation-Cfn-Guard-Demo --policy-document file://CloudFormationRolePolicy_example.json
Capture the policy ARN that you get in the output to use in the next steps.
Creating roles and trust policies
The following code is the trust policy for CodePipeline in JSON format:
{ "Version": "2012-10-17", "Statement": [ { "Effect": "Allow", "Principal": { "Service": "codepipeline.amazonaws.com" }, "Action": "sts:AssumeRole" } ]
}
Create your role for CodePipeline with the following CLI command:
aws iam create-role --role-name CodePipeline-Cfn-Guard-Demo-Role --assume-role-policy-document file://RoleTrustPolicy_CodePipeline.json
Capture the role name for the next step.
The following code is the trust policy for AWS CloudFormation in JSON format:
{ "Version": "2012-10-17", "Statement": [ { "Sid": "", "Effect": "Allow", "Principal": { "Service": "cloudformation.amazonaws.com" }, "Action": "sts:AssumeRole" } ]
}
Create your role for AWS CloudFormation with the following CLI command:
aws iam create-role --role-name CF-Cfn-Guard-Demo-Role --assume-role-policy-document file://RoleTrustPolicy_CloudFormation.json
Capture the role name for the next step.
Finally, attach the permissions policies created in the previous step to the IAM roles you created:
aws iam attach-role-policy --role-name CodePipeline-Cfn-Guard-Demo-Role --policy-arn "arn:aws:iam::<AWS Account Id >:policy/CodePipeline-Cfn-Guard-Demo"
aws iam attach-role-policy --role-name CF-Cfn-Guard-Demo-Role --policy-arn "arn:aws:iam::<AWS Account Id>:policy/CloudFormation-Cfn-Guard-Demo"
Creating a pipeline
We can now create our pipeline to assemble all the components into one managed, continuous mechanism.
- On the CodePipeline console, choose Pipelines.
- Choose Create new pipeline.
- For Pipeline name, enter a name.
- For Service role, select Existing service role.
- For Role ARN, choose the service role you created in the previous step.
- Choose Next.
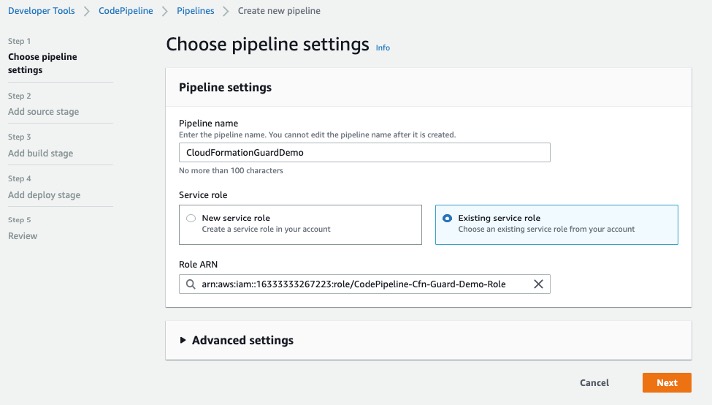
Setting Up CodePipeline environment
- In the Source section, for Source provider, choose AWS CodeCommit.
- For Repository name¸ enter your repository name.
- For Branch name, choose master.
- For Change detection options, select Amazon CloudWatch Events.
- Choose Next.
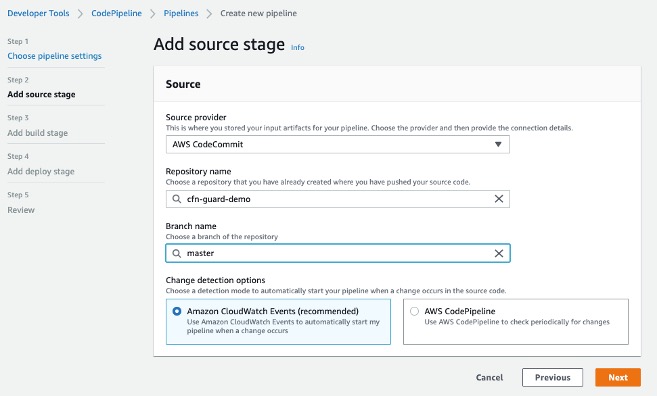
Adding CodeCommit to CodePipeline
- In the Build section, for Build provider, choose AWS CodeBuild.
- For Project name, choose the CodeBuild project you created.
- For Build type, select Single build.
- Choose Next.
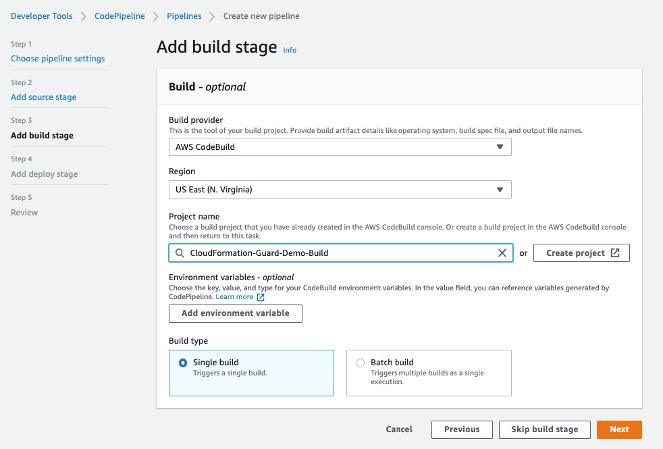
Adding Build Project to Pipeline Stage
Now we will create a deploy stage in our CodePipeline to deploy CloudFormation templates that passed the CloudFormation Guard inspection in the CI stage.
- In the Deploy section, for Deploy provider, choose AWS CloudFormation.
- For Action mode¸ choose Create or update stack.
- For Stack name, choose any stack name.
- For Artifact name, choose BuildArtifact.
- For File name, enter the CloudFormation template name in your CodeCommit repository (In case of our demo it is cfn_template_file_example.yaml).
- For Role name, choose the role you created earlier for CloudFormation.
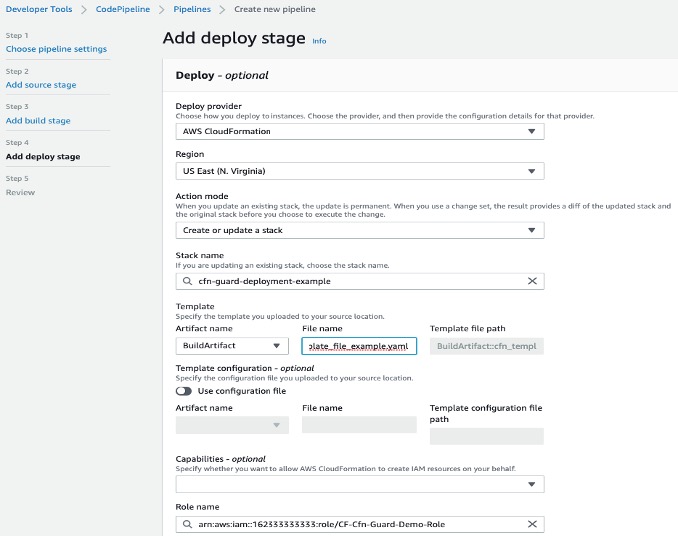
Adding deploy stage to CodePipeline
22. In the next step review your selections for the pipeline to be created. The stages and action providers in each stage are shown in the order that they will be created. Click Create pipeline. Our CodePipeline is ready.
Validating the CI/CD pipeline operation
Our CodePipeline has two basic flows and outcomes. If the CloudFormation template complies with our CloudFormation Guard rule set file, the resources in the template deploy successfully (in our use case, we deploy an EC2 instance with an encrypted EBS volume).
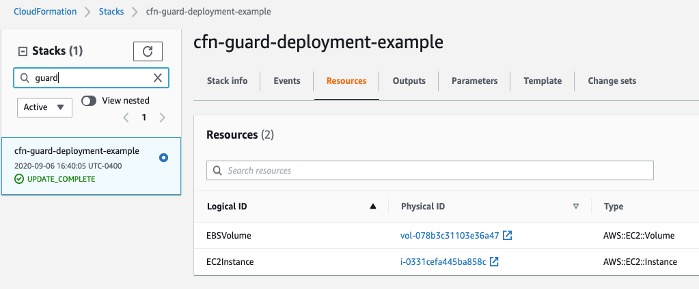
CloudFormation Console
If our CloudFormation template doesn’t comply with the policies specified in our CloudFormation Guard rule set file, our CodePipeline stops at the CodeBuild step and you see an error in the build job log indicating the resources that are non-compliant:
[EBSVolume] failed because [Encrypted] is [false] and the permitted value is [true][EC2Instance] failed because [t3.2xlarge] is not in [t2.micro,t3.nano,t3.micro] for [InstanceType]Number of failures: 2
Note: To demonstrate the above functionality I changed my CloudFormation template to use unencrypted EBS volume and switched the EC2 instance type to t3.2xlarge which do not adhere to the rules that we specified in the Guard rule set file
Cleaning up
To avoid incurring future charges, delete the resources that we have created during the walkthrough:
- CloudFormation stack resources that were deployed by the CodePipeline
- CodePipeline that we have created
- CodeBuild project
- CodeCommit repository
Conclusion
In this post, we covered how to integrate CloudFormation Guard into CodePipeline and fully automate pre-deployment compliance checks of your CloudFormation templates. This allows your teams to have an end-to-end automated CI/CD pipeline with minimal operational overhead and stay compliant with your organizational infrastructure policies.
